
Operating instructions


21
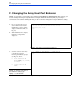
G. Changing the Array Loop IDs
G. Changing the Array Loop IDs
NOTE: Your array comes preset with the following default fibre channel loop identifiers (IDs): 108
(controller 1) and 110 (controller 2). If the default loop IDs conflict with the loop IDs of any other devices
in your configuration, you need to change the array loop IDs using the Virtual Front Panel (VFP). If they
do NOT conflict with other loop IDs, you do not need to change the array loop ID settings.
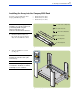
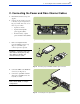
H. Installing the Array Software
Install the HP Command View SDM software and create a Logical Unit (LUN). (Refer to the HP Command View
User’s Guide, part no. T1001-90902).
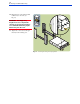
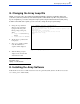
1. Change the loop identifiers
(IDs) for each controller by
typing the following at the
Ready prompt (see Fig. 45),
where:
• <loop ID> is the new loop
address
• <controller ID> is 1 or 2.
2. The the new loop address will
be displayed.
3. Type “yes” to initiate a partial
reset. The initialization
sequence will be displayed.
Fig. 45. Changing a loop address
4. When the Ready prompt is
displayed, disconnect the PC
and the RS-232 cable.
NOTE: To view the current loop
ID settings, type:
vfpdsp -s <controller ID>
Ready > vfpmgr -L <loop ID> -c <controller ID>
Loop ID will be changed to: <loop ID>
Change is valid after a reset. Do you wish to reset now (yes/no)? :yes
Partial Reset...
102EX15I1214002213 : Initializing:
02 04 06 08 0A 0C 0E 12 16 18 1A 1C 1D 1E 20 22 24 26
102EX15I1214002213 : Ready
Ready >