
Operating instructions


18
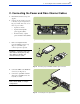
D. Connecting the Serial Cable
D. Connecting the Serial Cable
NOTE: If you need to change the array host port behavior or the array loop IDs, follow the steps in this
section. Otherwise, go to Section E.
Changing the array host port behavior: If your array is connected to a host that is running Windows
2000, Windows NT, or Linux, you need to change the array host port behavior using the Virtual Front Panel
(VFP).
Changing the array loop IDs: Your array comes preset with the following default fibre channel loop
identifiers (IDs): 108 (controller 1) and 110 (controller 2). If the default loop IDs conflict with the loop IDs of
any other devices in your configuration, you need to change the array loop IDs using the Virtual Front
Panel (VFP).
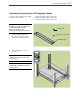
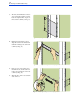
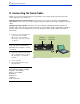
1. Connect one end of the null-modem
serial cable to the controller 1
RS-232 port or the controller 2
RS-232 port on the array rear panel
(see Fig. 41).
NOTE: The RS-232 port on either
array controller can communicate
with either array controller 1 or array
controller 2.
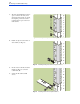
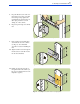
2. Connect the other end of the serial
cable to the RS-232 port on a laptop
PC, desktop PC, or any RS-232
terminal.
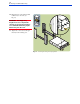
Fig. 41. Connecting the serial cable
3. Power-on the PC.
4. Start a terminal emulator using
HyperTerminal.
NOTE: Use the following settings in
HyperTerminal, COM1 (or COM2)
Properties, Port Settings:
Bits per second: 9600
Data bits: 8
Parity: None
Stop bits: 1
Flow control: None
Controller 1 Controller 2
RS-232 Port RS-232 Port