
Operating instructions


15
B. Racking a Field-Rackable Array
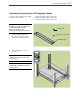
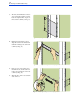
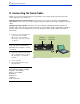
7. Drop the rail tab lower notches onto
the locating rod (see Fig. 34). Slide
the locating rod clips against the
mounting tabs at each end of the rod.
(The clips prevent the rod from
sliding out of the column.)
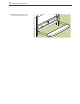
8. Repeat steps 4 through 7 for the left
rail.
Fig. 34. Positioning rails over locating rods in Compaq 9000
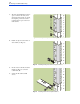
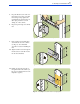
9. Insert a 5/16-18 sheet metal nut in
each marked hole on the columns
(see Fig. 35). Use a flat-blade
screwdriver to assist in installing the
nuts.
10. Tighten a 5/16-18 screw through the
innermost slot in each rail end and
into the sheet metal nut.
Fig. 35. Attaching rails to columns in Compaq 9000
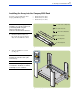
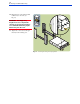
11. Install one 10-32 clip nut each on
the right and left front columns (see
Fig. 36). (Use the black arrow on the
template as a guide.)
Fig. 36. Installing front column nuts in Compaq 9000