
Installation guide


Command View XP installation guide 35
3. Click Licensing in the left panel in Command View.
4. Click the disk array you want to access from the Serial Number column. The License Key Management
main pane is displayed.
5. From the License Key Management main pane, click Install. The License Key Management (Install) pane
is displayed.
6. Select the check box for each license key you want to install.
7. Enter the license key code(s).
8. Click OK to add the license key and return to the License Key Management main pane.
Install the Command View client Command Line Interface (CLI)
Command View has a Command Line Interface (CLI). Use the CLI to manage and monitor XP disk arrays
from the operating system prompt of a system located anywhere on the network, including the Command
View management station.
1. Get the cvcli.tar file by navigating to the Command View Support tab. Select Support >
Download Page > Command View Command Line Interface (CV CLI) Download Section > CV CLI Client.
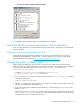
2. Un-tar the cvcli.tar file to any location on the CLI host. For a Windows host, use WinZip 7.0 or
later. For an HP-UX host, use the command tar xvf cvcli.tar.
3. After you un-tar the file, the CLI components will be in <your_path>/cvcli. It does not matter
where you un-tar the files, but all of the following files must be in the same directory:
• cli.jar: CLI java classes.
• CVCLI.bat: CLI execution Windows batch file.
• cvcli: CLI execution UNIX script.
• CVCLI.properties: CLI properties file.
• CVCLI.txt: Installation instructions for the CLI client.
4. To complete the installation, follow the instructions in the CVCLI.txt file.
Additional information about the CLI is in the HP StorageWorks Command View XP Command Line
Interface (CLI) reference guide, located on the Command View CD, or from the Support tab in Command
View.
Accessing the Command View GUI
1. Start the browser and enter the Command View management station’s host name or IP address as the
URL. The Command View initial window is displayed.
or
1. Point your browser directly at the array public IP address (for example, http://123.45.67.15).
2. Enter the user name and password.
3. Click OK.
4. After the user name and password have been verified, the Device Launcher pane is displayed if you
logged into the Command View server, and the Device Manager Identity pane is displayed if you
logged directly into the array.
Setting up Path Connectivity
Path Connectivity identifies, maps, and diagnoses the connections (or paths) between your XP disk array
and hosts that consumes storage on the disk array.