
Installation guide


32 Installation
Disable the Web Proxy service
When you are using a Web browser to manage an XP128/XP1024/XP12000, disable the Web proxy
on the client by completing one of the following:
• Internet Explorer only: Disable the proxy server in your browser,
or
• Internet Explorer or Mozilla: Add the XP128/XP1024/XP12000 IP address to the list of excluded
addresses (that are not to be directed through a Web proxy service).
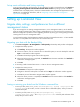
Disabling proxy service in the Internet Explorer browser
1. In Internet Explorer, select Tools > Internet Options > Connections > LAN Settings.
2. Clear the Use a proxy server check box.
3. Click OK. Click OK again to exit and save changes.
Adding the IP address of the disk array to the list of web proxy excluded addresses
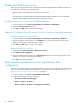
Adding IP addresses in Internet Explorer
1. In Internet Explorer, select Tools > Internet Options > Connections > LAN Settings > Advanced.
2. Enter the IP address of the disk array in the Exceptions box. If you are entering more than one IP
address, use semicolons to separate each IP address.
3. Click OK. Click OK again to exit and save changes.
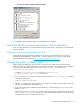
Adding IP addresses in Mozilla
1. In Mozilla, select Edit > Preferences > Advanced > Proxies.
2. Click Manual Proxy Configuration.
3. Enter the IP address of the disk array in the No Proxy for field. If you are entering more than one IP
address, use commas to separate each IP address.
4. Click OK to exit and save changes.
Verify the Internet Explorer browser requirements and
configuration
If you are using Internet Explorer, complete the procedures in this section to verify that the browser options
are set correctly and any additional configurations are made. If you are using Mozilla, skip to ”Verify the
Mozilla browser requirements and configuration” on page 33.
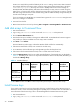
1. In Internet Explorer, select Tools > Internet Options > Advanced.
2. Verify that the following settings are enabled:
• Browsing > Disable script debugging
• HTTP 1.1 settings > Use HTTP 1.1
• HTTP 1.1 settings > Use HTTP 1.1 through proxy connections