
Installation guide


Command View XP installation guide 31
Set up event notification and history reporting
To set up event notification and reporting, use the instructions located in Command View under Support >
Integrating HP StorageWorks Command View XP with Other Products. By setting up event notification,
Command View can display events, which are communicated to other management applications through
SNMP traps. For additional information, refer to ”Integrating with miscellaneous management
applications” on page 44.
Setting up Command View
Migrate data, settings, and preferences from a different
management station
If you are moving from an existing management station to a new management station, use the Backup
Utility to migrate Command View data, settings, and preferences. You can use this tool to preserve your
data and configuration preferences when upgrading hardware by saving your existing settings and then
restoring them on the new management station.
To use the Backup Utility, both management stations must have Command View XP 2.1 or later installed.
This tool is not compatible with older versions of Command View XP.
Migrating your data with the Backup Utility
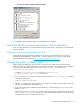
1. Click Start > Programs > HP StorageWorks > Backup Utility. The Backup Utility window is displayed.
2. Complete the backup process:
a. Click Backup. The Open File window appears.
b. Choose a location, such as a network drive or shared file system, to save the backup file and click
Open. A confirmation window appears.
c. Click Yes. The Backup Progress status window appears.
d. When the backup process is completed, the Finished button becomes available. Click Finished. A
confirmation message appears.
e. Click OK.
3. If necessary, install Command View XP 2.1 or later on the new management station.
4. Complete the restore process:
a. Click Restore. The Open File window appears.
b. Navigate to where the backup file is located and click Open. A confirmation window appears.
c. Click Yes to proceed. The Restore Progress status window appears.
d. When the restore process is completed, the Finished button becomes available. Click Finished. A
confirmation message appears.
e. Click OK.
Saving or restoring your data from the Windows command line
• To save your files, enter %HPSS_HOME%\bin\backuputility -backup <target-path>. The
<target-path> is the location, such as a network drive or shared file system, where you want to
save the backup file.
• To restore your files, enter %HPSS_HOME%\bin\backuputility -restore
<target-path/file-name>. The <target-path/file-name> is the full path and name of the
backup file you want to restore.