
Technical data
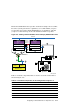
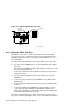
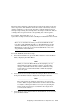

The first and second lines of the default screen show the status of the two
drives (if present). The third line shows the status of the library robotics,
and the fourth line is a map of the magazine, with the numbers from 0
through 9 representing the cartridge slots. Rectangles on this line indicate
cartridges that are present in the corresponding slot of the magazine.
For example, this fourth line (0>XX_______<9, where X
represents rectangles) indicates that cartridges are installed in slots 0 and 1.
______________________ Note _______________________
There are no switches for setting a mechanical SCSI ID for the
tape drives. The SCSI IDs default to 5. The MiniLibrary sets the
electronic SCSI ID very quickly, before any device can probe the
MiniLibrary, so the lack of a mechanical SCSI ID does not cause
any problems on the SCSI bus.
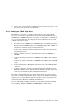
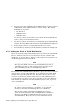
To set the SCSI ID, follow these steps:
1. From the Default Screen, press the Enter button to enter the Menu
Mode, displaying the Main Menu.
____________________ Note _____________________
When you enter the Menu Mode, the Ready light goes out,
which indicates that the module is off line, and all media
changer commands from the host return a SCSI not ready
status until you exit the Menu Mode and the Ready light
comes on again.
2. Press the down arrow button until the Configure Menu item is selected,
then press the Enter button to display the Configure submenu.
____________________ Note _____________________
The control panel up and down arrows have an auto-repeat
feature. When you press either button for more than one-half
second, the control panel behaves as if you were pressing the
button about four times per second. The effect stops when
you release the button.
3. Press the down arrow button until the Set SCSI item is selected and
press the Enter button.
Configuring a Shared SCSI Bus for Tape Drive Use 8–25