
Technical data


.
.
.
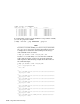
For more information on the hardware manager, see
hwmgr
(8).
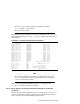
2. Search the display for the UDIDs (or worldwide names) for each of the
cluster installation disks and record the /dev/disk/dsk
n values.
If you used the grep utility to search for a specific UDID, for example
hwmgr -view dev | grep "IDENTIFIER=131" repeat the command
to determine the /dev/disk/dskn for each of the remaining cluster
disks. Record the information for use when you install the cluster
software.
You must label the disks before you install cluster software.
6.9.4 Label the Disks to Be Used to Create the Cluster
Before you run clu_create to create the first cluster member or
clu_add_member to add subsequent cluster members, you must label the
disks to be used for cluster software.
On the system where you installed the Tru64 UNIX operating system, if you
have not already done so, boot the system. Determine the /dev/disk/dskn
values to use for cluster installation (Section 6.9.3).
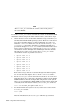
Initialize disklabels for all disks needed to create the cluster. The example
(Table 6–4) uses disks dsk18 (/var), dsk19 (/usr), dsk20 [cluster root (/)],
and dsk21 (Quorum). For instance:
# disklabel -rw dsk20 HSG80
6.9.5 Install the TruCluster Server Software and Create the First
Cluster Member
After labeling the disks, use the TruCluster Server Cluster Installation
procedures and install the TruCluster Server software on the first cluster
member (the system where you just installed Tru64 UNIX).
After installing the TruCluster Server software subsets, run the clu_create
command to create the first cluster member using the procedures in the
Cluster Installation manual.
When clu_create terminates, do not reboot the system. Shut down
the system and reset the bootdef_dev console environment variable to
provide multiple boot paths to the member system boot disk before booting
(Section 6.9.6). Then boot the first cluster member.
Using Fibre Channel Storage 6–71