
User guide
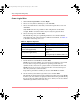


Table Of Contents
- MSA1000 User Guide
- Contents
- About this Guide
- Chapter 1: Introduction
- Chapter 2: Operating System Specific Information
- Chapter 3: MSA1000 Setup and Sample Configurations
- Chapter 4: Operation and Management
- Chapter 5: Array Configuration Utility (ACU)
- Installing the ACU on the Server
- Accessing the ACU
- Description of Screen Regions
- Configuring a New Controller
- Modifying an Existing Controller
- Probability of Logical Drive Failure
- Chapter 6: Command Line Interface (CLI)
- CLI Overview
- CLI Setup
- Help Commands
- Display Commands
- Array Controller Configuration Commands
- LUN Management Commands
- Server Connection Commands
- Selective Storage Presentation/Access Control List Commands
- Appendix A: Regulatory Compliance Notices
- Appendix B: Electrostatic Discharge
- Appendix C: Specifications
- Appendix D: Hard Drive Arrays
- Appendix E: Recovering from Hard Drive Failure
- Appendix F: Controller Display Messages
- Appendix G: Recovery ROM and ROM Cloning
- Appendix H: SCSI ID Assignments
- Index
Array Configuration Utility (ACU)
104 Modular SAN Array 1000 User Guide
Create a Logical Drive
1. Click Create a logical drive and click Begin.
2. Choose an array that has unused space and click Next.
3. Choose the fault-tolerance level that you want the logical drive to use and
click Next.
Only RAID levels that are possible for this configuration are listed. For
example, RAID 5 is not listed if the array has only two physical drives.
4. Choose the stripe size and click Next.
The default stripe size gives optimum performance in a mixed read/write
environment. If your system is used in a different environment, see Table 14
to determine what stripe size to set.
5. Decide whether to use MaxBoot and click Next.
MaxBoot increases the number of sectors used per track from 32 to 63. This
increase allows a larger boot partition for operating systems that use
cylinders, heads, and sectors of a physical drive to determine the drive size.
MaxBoot also lets you create a larger logical drive or increase the logical
drive size (extend it) at some later time.
Logical drive performance is likely to decrease with MaxBoot enabled.
6. Set the size that you want the logical drive to be and click Next.
The default size shown is the largest possible logical drive size for the RAID
level that you chose and the set of physical drives that is being used. Reducing
the size of the logical drive liberates drive space, which you can use to build
additional logical drives on the same array.
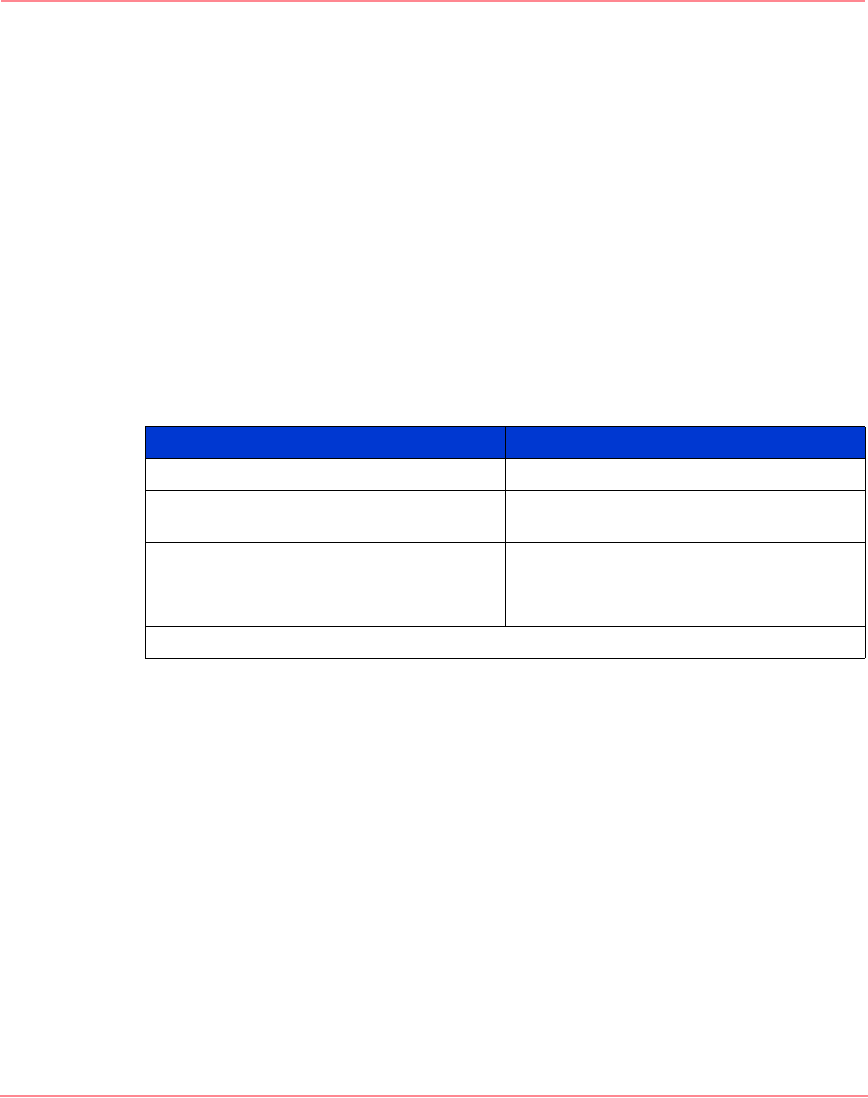
Table 14: Optimum Stripe Size
Type of Server Application Suggested Stripe Size Change
Mixed read/write Accept the default value
Mainly sequential read (such as
audio/video applications)
Use larger stripe sizes for best
performance
Mainly write (such as image
manipulation applications)
Use smaller stripes for RAID 5, RAID
ADG*
Use larger stripes for RAID 0, RAID 1+0
*Not all controllers support RAID ADG
230941-005_MSA1000_UG.book Page 104 Thursday, April 17, 2003 5:53 PM