
User guide


Running the Array Configuration Utility 5-21
For each controller, the drive arrays, logical drives, and physical drives
configured for that controller are listed. Use the Drive View option, located
below the Configuration View box, to select the Physical or Logical view.
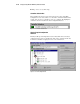
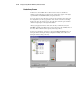
Figure 5-16 shows the physical view of an RA4000 controller in slot 1. Listed
below the controller are two unassigned drives: one 9.1-GB drive and one
4.3-GB drive. This controller has two drive arrays, Array A and Array B,
along with a number of drives within each array. Array A has an online spare.
NOTE: When viewing the Configuration View box, selecting an item—a controller, array,
logical drive, or physical drive—will cause the hard drive tray LEDs to blink. Use this
feature to identify a specific physical drive or to identify the external drives attached to a
controller.
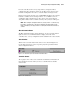
More Information Button
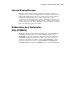
The More Information button, shown in Figure 5-17, is located at the bottom
right side of the screen. Click this button to display a list of the entire
controller, drive, or array configuration details available for the selected items.
Drive View Box
This box is located at the bottom left of the screen as shown in Figure 5-17.
Use the Drive View box to select a logical or physical representation in the
View Configuration list box.
Figure 5-17. Drive View options box and More Information button
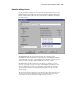
Controller Buttons
The top right corner of the screen contains the Controller box. The buttons in
the Controller box activate when you select a controller in the Controller
Selection box.
Figure 5-18. Controller box