
User guide


Running the Array Configuration Utility 5-13
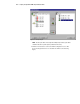
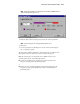
Figure 5-10. Expansion wizards - Logical Drive screen
6. Click the Create Logical Drive button.
7. Set the fault tolerance, array accelerator, stripe size, and size for Logical
Drive 2.
8. Click the Done button.
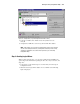
9. At the main screen, select Controller, Save Configuration from the
menu bar. This saves the new settings for Logical Drive 2 and starts the
capacity expansion process.
CAUTION: In case of power loss, capacity expansion process information is
temporarily stored in the Array Accelerator memory. To prevent the loss of data
in the expanding logical drive, do not interchange RA4000 controllers or Array
Accelerator boards during a capacity expansion process.
NOTE: Logical Drive 2 will not be accessible until the capacity expansion process has
completed on Logical Drive 1.