
User guide


2-12 Compaq StorageWorks RAID Array 4100 User Guide
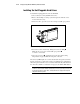
Installing the Hot-Pluggable Hard Drives
To install the hot-pluggable drives into the RA4100:
1. Choose the bay location (SCSI ID) of the drive.
2. Refer to the markings on storage system front panel to find the correct
location of the drive tray.
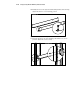
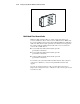
3. On the new drive, press the ejector lever and pivot to full open position.
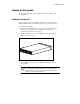
1
2
Figure 2-7. Inserting the drive and latching into place
4. Insert the new drive into the bay, sliding it in as far as it will go .
Make sure the ejector lever is in the full open position
to ensure a correct latch.
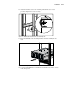
5. Close the ejector lever against the front of the drive. The locking
hinge must be engaged behind the front panel of the unit.
The drive tray LEDs light one at a time and then turn off together to indicate
that the system has recognized the new drive. In fault-tolerant configurations,
allow the replacement drive to be reconstructed automatically with data from
the other drives. While reconstruction is in progress, the Online LED flashes.
IMPORTANT: After installing the drive, pull it to see if the tray is properly seated. If you
are able to remove the drive without releasing the ejector lever, open the ejector lever all
the way and try again to seat the drive, ensuring that the lever engages the front panel
and pull the drive into position.