
User guide


Installation 2-9
5. Use a pencil to outline the square holes in the front mounting rails
indicated on the rack template tool that will be used to secure the
mounting brackets and the storage system to the rack cabinet.
6. Use the reverse side of the rack template tool to mark the equivalent
mounting holes on the rear mounting rails of the rack cabinet.
CAUTION: To reduce the risk of injury or damage to the equipment, the
mounting brackets must be level. If the brackets are not level, the RA4100
cannot be installed correctly.
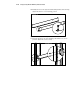
7. Use the tick-marks as a reference for determining the correct mounting
position. Each tick-mark (a small dimple on the edge of the vertical
mounting rails) is one “U” or 1.75 inches. The markings on the template
will match the tick-marks on the rear mounting rails when the alignment
is correct.
8. Use the number of holes between the bottom of the rack and the
mounting brackets as a reference.
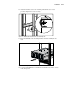
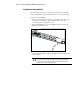
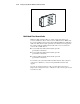
9. Install the cage nuts in the marked locations on the front and rear
vertical mounting rails in the rack cabinet.
TROJO33.EPS
Figure 2-2. Installing the cage nuts