
User`s guide

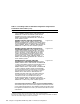

Table 2–1: Configuring TruCluster Hardware for Use with the RA3000
(cont.)
Step Action Refer to:
5 Power up the system and use the show
config and show device console commands
to display the installed devices and
information about the KZPBA-CBs on the
AlphaServer systems. Look for QLogic
ISP1020 in the show config display and
isp in the show device display to determine
which devices are KZPBA-CBs.
Section 2.2.3 and
Example 2–1 through
Example 2–4
6 If necessary, update the SRM firmware. Firmware release notes for
the system (see Section 2.2.1)
______________________ Note ______________________
The SRM console firmware includes the ISP1020/1040-based PCI
option firmware, which includes the KZPBA-CB. When you update the
SRM console firmware, you are enabling the KZPBA-CB firmware to
be updated. On a power-up reset, the SRM console loads KZPBA-CB
adapter firmware from the console system flash ROM into NVRAM for
all Qlogic ISP1020/1040-based PCI options, including the KZPBA-CB
PCI-to-Ultra SCSI adapter.
7 Use the show pk* or show isp* console
commands to determine the KZPBA-CB SCSI
bus ID, and then use the set console
command to set the SCSI bus ID.
Section 2.2.4 and
Example 2–5 through
Example 2–7
______________________ Notes ______________________
Ensure that the SCSI ID that you use is distinct from all other SCSI
IDs on the same shared SCSI bus. If you do not remember the other
SCSI IDs, or do not have them recorded, you must determine these
SCSI IDs.
If you are using a DS-DWZZH-05, you cannot use SCSI ID 7 for a
member systems’ host adapter; SCSI ID 7 is reserved for
DS-DWZZH-05 use.
If you are using a DS-DWZZH-05 and fair arbitration is enabled, you
must use the SCSI ID assigned to the hub port the adapter will be
connected to.
You will have problems if you have two or more SCSI adapters at the
same SCSI ID on any one SCSI bus.
8 Repeat steps 1 through 7 for any other
member systems.
9 Cable the member system to the RAID Array
3000 subsystem:
Using the StorageWorks RAID Array 3000 in a TruCluster Configuration 2–5