
User guide


Hardware options installation 52
4.
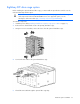
Remove the large redundant fan air baffle, if installed ("Remove the large redundant fan air baffle"
on page 28).
5. Remove the DIMM baffle, if installed ("Remove the DIMM baffle" on page 29).
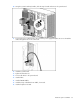
6. Remove a fan, if necessary.
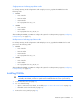
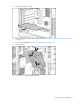
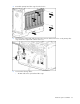
7. Open the DIMM slot latches.
8. Install the DIMM.
9. Install a fan, if removed.
10. Install the DIMM baffle.
11. Install the large redundant fan air baffle, if removed.
12. Install the access panel (on page 28).
13. Do one of the following:
o Close or install the tower bezel, as needed.
o Slide the server back into the rack.
14. Power up the server (on page 25).
After installing DIMMs, configure the AMP mode in RBSU ("HP ROM-Based Setup Utility" on page 92).
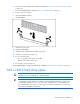
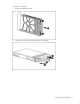
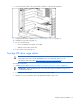
SAS or SATA hard drive option
CAUTION: For proper cooling, do not operate the server without the access panel, baffles,
expansion slot covers, hard drives, or blanks installed.
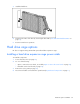
IMPORTANT: When installing a x3/x1 SAS cable in an SFF system, HP recommends
connecting the x3 part of the x3/x1 cable to the SAS hard drive backplane connector that
corresponds to hard drive slots 1 to 4. In this setup, hard drive slot 1 is not available, but
because hard drive slots 2 to 4 are connected, one continuous volume can be created. All
drive slots are available in LFF systems.