
User guide


Setup 37
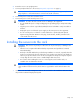
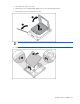
2.
Install an additional extender bracket (included with the server) to the cable management arm. Refer
to "Converting the cable management arm swing" in the installation instructions that ship with the 3-
7U Quick Deploy Rail System.
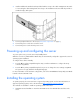
3. Connect peripheral devices to the server ("Rear panel components" on page 9).
4. Connect the power cord to the rear of the server.
5. Connect the power cord to the AC power source.
Powering up and configuring the server
To power up the server, press the Power On/Standby button.
While the server boots, RBSU and the ORCA utility are automatically configured to prepare the server for
operating system installation.
To configure these utilities manually:
• Press the F8 key when prompted during the array controller initialization to configure the array
controller using ORCA.
• Press the F9 key when prompted during the boot process to change the server settings using RBSU.
The system is set up by default for the English language.
For more information on the automatic configuration, refer to the HP ROM-Based Setup Utility User Guide
located on the Documentation CD.
Installing the operating system
To operate properly, the server must have a supported operating system. For the latest information on
supported operating systems, refer to the HP website (http://www.hp.com/go/supportos
).
Two methods are available to install an operating system on the server:
• SmartStart assisted installation—Insert the SmartStart CD into the CD-ROM drive and reboot the
server.