
Specifications


Replacing and Configuring Appliance Components
113Continuous Access Storage Appliance Installation and Maintenance Guide
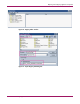
This command displays the contents of the sanlink log, including the search string and
a four–digit number as follows:
verifySharedDiskScsiAddress – Shared Disk found at 4 0 0 0.
11. Search the log to find a four–digit number that is not equal to 4 0 0 0, such as:
verifySharedDiskScsiAddress – Shared Disk found at 6 0 0 0.
12. Record the number that you find.
13. To open the sanlink.cfg file in Notepad, enter:
cd c:\Rpic
notepad sanlink.cfg
14. Locate the string SharedDiskScsiAddress=X X X X, where X X X X is the SCSI
address of the shared storage array.
15. Change the value of X X X X to the number you recorded in step 12.
16. Save and close the sanlink.cfg file.
17. Return to the hp OV CASA Console window and click service viewer.
The Services window opens.
18. Select the RPIC DPF service, set it to Automatic, and then click Start.
19. After RPIC DPF has started, repeat step 18 for the SMS service.
20. Close the Services window.
21. Select sanos admin > launch from the console window:
22. Log in to sanosadmin and enter:
mod hba –updatehbas
23. When you receive a message that the HBA(s) have been updated, exit sanosadmin.
24. Press Alt+C to open a command prompt window and enter:
cd C:\Rpic
notepad sanlink.cfg
The sanlink.cfg file opens in Notepad.
25. Locate the string SharedDiskScsiAddress=X X X X and change the value
to 4 0 0 0.
26. Save and close the sanlink.cfg file.
27. Connect the storage cables to the appliance node.
28. Reboot the appliance node.
29. After the node reboots, verify that all services have started successfully.
30. Open sanosadmin and enter:
mod hba –updatetargets
31. To verify that the nodes can detect each other, enter:
get node
32. Repeat step 31 on the other appliance node.
33. Perform a backup on both appliance nodes.