
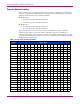
Specifications


Replacing and Configuring Appliance Components
100 Continuous Access Storage Appliance Installation and Maintenance Guide
Creating and collecting logs
If you need to replace an appliance component, the CASA support team may ask you to create
and collect the appliance software logs. To do this, you must have network access to the
appliance from either a customer workstation or your laptop. If you connect your laptop to the
appliance node using a crossover Ethernet cable, ensure that your laptop has an IP address on
the same subnet as the appliance nodes.
The CASA support team may also ask you to create a backup of the appliance configuration.
Refer to “Backing Up and Restoring Files” in the HP OpenView Continuous Access Storage
Appliance System Administrator’s Guide for more information.
Note: For Windows 95/98 workstations, you must log in to the workstation as the administrator.
To create the logs:
1. Log in to sanosadmin on the appliance node and enter:
getlogs
2. Repeat step 1 on the peer node.
To collect the logs:
1. From the desktop of your laptop or a customer workstation, click Start > Run.
The Run dialog box opens.
2. Enter the appliance node’s IP address in the Open box using the following format:
\\<ipaddress of appliance node>\C$
The login window opens.
3. Log in to the appliance node as follows:
■ User name—administrator
■ Password—[D15K]
The folders on the c:\ drive are displayed.
Note: Win95/98 workstations prompt for the password only. Use the password listed above.
4. Open the logs folder.
5. Copy only the ZIP file from the logs folder to your laptop or a customer workstation.
6. Repeat step 1 through step 5 on the peer node.
7. E–mail the logs to the CASA support team (support_team@hp.com) or contact the CASA
support team to set up FTP access.