
Technical data
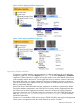
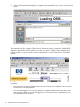

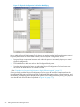
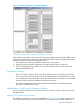


Figure 13 Physical Configuration Tool Before Modifying
Now, with the Physical Configuration Tool, there is no need to use the Set Physical Location action*
to specify Rack Name or Rack Offset. Instead, use the Physical Configuration Tool to:
• Drag and drop components between and within the panes to accurately depict your actual
physical configuration.
• Click Add Rack to add new racks to the Configured Racks pane.
• Save the physical view for future use within the Physical Configuration Tool and even save
the view to an HTML file for use outside of OSM.
* See “Example: No Previous Rack Names or Rack Offsets Assigned” (page 57).
Once you have used the Physical Configuration Tool to move all modular components from the
Unconfigured FRUs pane and the Incorrectly Configured FRUs pane to their correct locations, and
resolved any overlapping areas (displayed as yellow in the Configured Racks pane), your physical
view should look more like the one pictured in Figure 14 (page 57)).
56 Getting Started With OSM Applications