
Specifications

Replacement Procedures 2–43
NOTE: The FRUTIL PVA Replacement Menu provides options for three enclosures regardless of
how many enclosures are actually connected.
6. From the menu, select one of the following options:
■ Enter option 1 to replace the PVA in the master enclosure.
■ Enter option 2 to replace the PVA in the first expansion enclosure
■ Enter option 3 to replace the PVA in the second expansion enclosure.
After selection, the following display appears:
Do you have a replacement PVA module? Y/N
7. Enter Y(es). The following display appears:
Ensure the replacement PVA’s address is set to zero [
or 2 or 3
].
Press return to quiesce device port activity.
8. Set the replacement PVA address (if needed, refer to the UltraSCSI RAID Enclosure
(BA370-Series) User Guide for instructions):
■ To 0 for the master enclosure
■ To 2 for the first expansion enclosure
■ To 3 for the second expansion enclosure
9. Press Return and wait for FRUTIL to quiesce the device ports. This might take
several minutes. The following display appears:
All device ports quiesced.
Replace the PVA in the master cabinet.
Press return to resume device port activity.
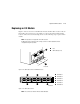
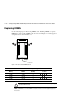
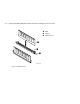
10. Disengage both retaining levers on the old PVA (see Figure 2–9, on page 2–17) and
remove it.
CAUTION: Carefully align the PVA in the appropriate guide rails. Misaligning the
module might damage the backplane.
11. Insert the replacement PVA and engage both retaining levers.