
Specifications

Replacement Procedures 2–41
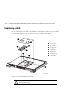
Removing a GLM
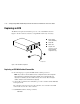
Use the following steps and Figure 2–11 to remove a GLM:
1. Remove the controller using either the steps in “Removing the Controller in a
Single-Controller Configuration,” page 2–11, or “Removing a Controller in a
Dual-Redundant Controller Configuration,” page 2–25.
2. Remove the screw that secures the access door on the top of the controller.
3. Remove the access door and set it aside.
4. Disengage the GLM locking tabs that protrude through the guide holes on the
bottom side of the controller.
5. Use your index finger and thumb to operate the release lever on the exposed end of
the GLM. Press the lower end of the release lever with your index finger while pulling
the raised end of the release lever up with your thumb.
6. Remove the GLM.
Installing a GLM
Use the following steps and Figure 2–11 to install a GLM:
NOTE: Before inserting the new GLM, note the holes in the board where the GLM will reside.
1. Insert the new GLM by first placing the cable connection end of the GLM through the
opening on the front of the controller.
2. Line up the locking tab on the bottom of the replacement GLM with the guide
holes in the board, and press firmly to seat the GLM.
3. Press the release lever firmly into place to secure the GLM.
4. Install the access door on the top of the controller and secure it with the screw.
5. Install the controller using either the steps in “Installing the Controller in a
Single-Controller Configuration,” page 2–12, or “Installing a Controller in a
Dual-Redundant Controller Configuration,” page 2–27.