
Specifications


Replacement Procedures 2–21
Once the cache module is removed, the following display appears:
Restarting all device ports. Please wait...
Device Port 1 restarted.
Device Port 2 restarted.
Device Port 3 restarted.
Device Port 4 restarted.
Device Port 5 restarted.
Device Port 6 restarted.
Do you have a replacement controller and cache module? Y/N
14. Enter N(o) if a replacement controller and cache module is not available.
■ FRUTIL will exit.
■ Disconnect the PC or terminal from the controller maintenance port.
Enter Y(es) if a replacement controller and cache module is available and it will be
installed now.
NOTE: Remove the DIMMs from the cache module for installation in the replacement cache
module. Then go to step 10 on page 2–23.
a. Press the DIMM retaining clips down at both ends of the DIMM being removed.
b. Gently remove the DIMM from the DIMM slot and place it onto an antistatic bag
or grounded antistatic mat.
c. Repeat step a and step b for each DIMM.
Installing a Controller and its Cache Module in a
Dual-Redundant Controller Configuration
Use the following steps to install a controller and its cache module.
CAUTION: ESD can easily damage a controller, cache module, or DIMM. Wear a
snug-fitting, grounded ESD wrist strap.
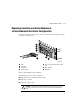
1. Insert each DIMM straight into the appropriate slot of the cache module, ensuring that
the notches in the DIMM align with the tabs in the slot (see Figure 2–15).
2. Press the DIMM gently into the slot until seated at both ends.
3. Engage two retaining clips for the DIMM.
4. Repeat step 1 through step 3 for each DIMM.