
Specifications


Replacement Procedures 2–13
1. Insert the new controller into its bay, and engage its retaining levers.
2. Connect all host bus cables to the new controller.
3. Connect a PC or terminal to the controller maintenance port.
4. Press and hold the reset button while inserting the program card into the new
controller.
5. Release the reset button and replace the program card ESD cover.
6. When the CLI prompt reappears, display details about the configured controller using
the following command:
SHOW THIS_CONTROLLER FULL
7. See the Compaq StorageWorks HSG80 Array Controller ACS Version 8.5 CLI
Reference Guide to configure the controller.
NOTE: If the controller being installed was previously used in another subsystem, it will need to
be purged of the old configuration (see CONFIG RESET in the
Compaq StorageWorks
HSG80
Array Controller ACS Version 8.5 CLI Reference Guide
).
IMPORTANT: In the following step, hold these buttons until the Port Buttons start FLASHING,
before releasing the two buttons. This sequence causes a CONFIGURATION RESTORE to occur.
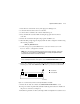
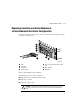
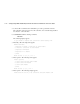
8. Restore the configuration by pressing and holding Port Button #6 (see Figure 2–8, )
and then press and hold the RESET button until the port buttons start F
LASHING.
Figure 2–8. Location of array controller reset and port #6 buttons on the OCP
9. Release the two buttons to initiate a CONFIGURATION RESTORE to occur.
10. Using code-load/code-patch utility (CLCP), install any patches that were installed on
the previous controller (see Chapter 3).
11. Mount the logical units on the host. If using a Windows NT platform, restart the server.
Reset button
Port button #6
123456
CXO6216C
1
2