
Specifications

Replacement Procedures 2–11
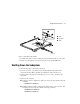
Replacing a Controller and Cache Module in a
Single-Controller Configuration
If both the controller and cache module need to be replaced, first follow the steps for
replacing a controller, and then the steps for replacing a cache module.
Replacing a Controller in a Single-Controller Configuration
Use the procedures in “Removing the Controller in a Single-Controller Configuration”
and “Installing the Controller in a Single-Controller Configuration” to replace a controller.
CAUTION: ESD can easily damage a controller. Wear a snug-fitting, grounded ESD
wrist strap.
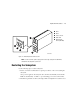
Removing the Controller in a Single-Controller
Configuration
Use the following steps to remove a controller:
1. From the host console, dismount the logical units in the subsystem. If using a
Windows NT platform, shut down the server.
2. If the controller is operating, connect a PC or terminal to the controller maintenance
port.
If the controller is not operating, go to step 5.
3. Run fault management utility (FMU) to obtain the last failure codes, if desired.
NOTE: If a container is initialized with the SAVE_ CONFIGURATION switch, save “this controller”
current device configuration using the CONFIGURATION SAVE command. If CONFIGURATION
SAVE is not used, manually configure the new controller as described in
HSG80 Array Controller
ACS Version 8.5 CLI Reference Guide
.
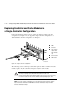
4. Shut down the controller with the following command:
SHUTDOWN THIS_CONTROLLER
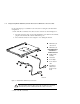
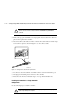
When the controller shuts down, the reset button and the first three LEDs are lit
continuously (see Figure 2–4). Receiving this indication can take several minutes,
depending on the amount of data that needs to be flushed from the cache modules.