
Specifications

Troubleshooting Resources 4–51
IMPORTANT: Use the auto-configure option if testing the read and write capabilities of every
disk drive in the subsystem.
4. Decline the auto-configure option to allow testing of a specific disk drive.
5. Accept the default test settings and run the test in read-only mode.
6. Enter the unit number of the specific disk drive to test.
For example: to test D107, enter the number 107.
7. If testing more than one disk drive, enter the appropriate unit numbers when prompted.
Otherwise, enter “n” to start the test.
NOTE: Use the control sequences listed in Table 4–20 to control DILX during the test.
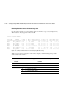
Testing the Read and Write Capabilities of a Disk Drive
Run a DILX Basic Function test to test the read and write capability of a disk drive.
During the Basic Function test, DILX runs the following four tests.
NOTE: DILX repeats the last three tests until the time entered in step 6 on page 4-53 expires.
■
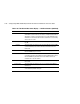
Write test. Writes specific patterns of data to the disk drive (see Table 4–21). DILX
does not repeat this test.
■ Random I/O test. Simulates typical I/O activity by issuing read, write, access, and
erase commands to randomly-chosen LBNs. The ratio of these commands can be
manually set, as well as the percentage of read and write data that are compared
throughout this test. This test takes six minutes.
■ Data-transfer test. Tests throughput by starting at an LBN and transferring data to the
next unwritten LBN. This test takes two minutes.
■ Seek test. Stimulates head motion on the disk drive by issuing single-sector erase and
access commands. Each I/O uses a different track on each subsequent transfer. The
ratio of access and erase commands can be manually set. This test takes two minutes.
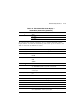
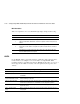
Table 4–20 DILX Control Sequences
Command Action
Ctrl/C Terminates the test.
Ctrl/G Displays the performance summary for the current test and continue testing.
Ctrl/Y Terminates the test and exits DILX.