
Specifications
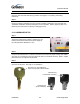


Table Of Contents
Operator Manual
Installation 2.1 © Genmega 2012
INSTALLATION
2.1 Genmega G2500™ INSTALLATION
2.1.1 UNPACKING
Ste
p
1
Upon receipt of your new Genmega ATM, check the box and packaging for any damage. If you
suspect any damage, mark the shipping receipt to indicate suspected concealed damage. Do not
discard the ATM packaging materials until you have verified any shipping damage claim. Contact
your distributor immediately if you see any shipping damage. It’s also advisable to take photos of
any damage.
NOTE:
You have 7 days from delivery to report any concealed damage. After 7 days we are
unable to process any shipping damage claims.
Ste
p
2
Verify the contents carefully with the packing list to make sure all items listed are included per your
order. Notify your distributor of any shortages.
2.1.2 PHYSICAL INSTALLATION
To install the Genmega G2500™ ATM, review the following steps:
Step 1
Place the system on a flat surface during installation. The system is top-heavy and has a
tendency to tip over. Be very careful when opening the top or bottom slide trays or vault door
prior to bolting down the ATM, it will be more likely to tip.
Step 2
Use the holes in the bottom of the vault to mark the floor or ATM location. Remove the ATM
before drilling the anchor holes. Anchors are not included with the ATM.
WARNING: Do not drill the holes through the vault. Dust from the drilling will damage ATM
components and void your warranty.
Due to variations in flooring and building codes, Genmega does not recommend a particular size
or type of anchor as each installation. Consult anchor manufacturers instructions for proper
installation. Maximum anchor diameter is ½.
Step 3
Place the G2500™ ATM on top of the anchors and tighten. Note that over-tightening the anchors
can cause the vault to go out of square and make door operation difficult. If this occurs, back off
the anchors or use leveling bolts.