279359-001.book Page i Thursday, May 16, 2002 10:15 AM b Getting Started Evo Notebook N610c Series Document Part Number: 279359-001 July 2002 This guide explains how to set up your hardware and software, identify the exterior components of the notebook, find and install the latest versions of Compaq software, and find additional information and support.
79359-001.book Page ii Thursday, May 16, 2002 10:15 AM © 2002 Compaq Information Technologies Group, L.P. Compaq, the Compaq logo, Evo, RomPaq, and SoftPaq are trademarks of Compaq Information Technologies Group, L.P. in the U.S. and/or other countries. Microsoft and Windows are trademarks of Microsoft Corporation in the U.S. and/or other countries. All other product names mentioned herein may be trademarks of their respective companies.
279359-001.book Page iii Thursday, May 16, 2002 10:15 AM Contents 1 Hardware and Software Setup Setting Up the Hardware . . . . . . . . . . . . . . . . . . . . . . . . . Setting Up the Software . . . . . . . . . . . . . . . . . . . . . . . . . . Installing Optional Applications . . . . . . . . . . . . . . . . Notebook Support and Safety Tips . . . . . . . . . . . . . . 1–1 1–4 1–5 1–6 2 A Look at the Notebook Display Components . . . . . . . . . . . . . . . . . . . . . . . . . . . .
279359-001.book Page iv Thursday, May 16, 2002 10:15 AM Contents 3 How to Get Information, Help and Updates Using the Documentation Library CD . . . . . . . . . . . . . . . 3–1 Viewing Guides on the CD . . . . . . . . . . . . . . . . . . . . 3–2 Contacting Technical Support . . . . . . . . . . . . . . . . . . . . . 3–3 Updating Compaq Software. . . . . . . . . . . . . . . . . . . . . . . 3–4 Obtaining the Compaq Support Software CD . . . . . . 3–5 Preparing to Update Software . . . . . . . . . . . . . . .
279359-001.book Page 1 Thursday, May 16, 2002 10:15 AM 1 Hardware and Software Setup Setting Up the Hardware Ä CAUTION: Setup must begin with connecting the notebook to AC power. To ensure that the correct drivers load and to prevent file corruption or damage to the components during initial setup: ■ Do not remove the battery pack until the notebook has been connected to external AC power. ■ Run the notebook on external AC power, not on battery power, throughout initial setup.
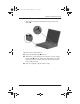
279359-001.book Page 2 Thursday, May 16, 2002 10:15 AM Hardware and Software Setup Plug the AC Adapter cable into the DC power connector 1. Plug the power cord into the AC Adapter 2 and into an electrical outlet 3. (Power cords and outlets vary by country.) Connecting the notebook to external power 2. Open the notebook by sliding the display release latch to the right 1 and raising the display 2.
279359-001.book Page 3 Thursday, May 16, 2002 10:15 AM Hardware and Software Setup 3. Turn on the notebook by sliding and releasing the power switch 1. Turning on the notebook When the notebook is turned on: ■ The power/standby light 2 turns on. ■ The battery pack in the battery bay begins to charge and the battery light 3 turns on. The battery light remains on while the battery pack is charging and turns off when the battery pack is fully charged. ■ You are prompted to begin software setup.
279359-001.book Page 4 Thursday, May 16, 2002 10:15 AM Hardware and Software Setup Setting Up the Software The initial setup prompt is displayed on the screen as soon as the notebook is connected to external power.
279359-001.book Page 5 Thursday, May 16, 2002 10:15 AM Hardware and Software Setup Installing Optional Applications You can install third-party applications or preloaded Compaq utilities at any time after initial setup is complete. ■ To install a third-party application, refer to the documentation included with the application. ■ To install a preloaded Compaq application, access the Setup Compaq Software utility: ❏ In Windows 2000 Professional, the Setup Compaq Software icon is on the desktop.
279359-001.book Page 6 Thursday, May 16, 2002 10:15 AM Hardware and Software Setup Notebook Support and Safety Tips After setting up the software, locate the support and safety information included with your notebook. ■ ■ Å ❏ Download the latest software and drivers for your notebook. ❏ Open an online service event with a Compaq support specialist. ❏ Get information about your notebook, including reference guides, specifications, white papers, and customer advisories.
279359-001.book Page 7 Thursday, May 16, 2002 10:15 AM Hardware and Software Setup Confirming Hibernation Setting is an energy-saving feature enabled at the factory that ✎ Hibernation can be initiated by you or by the system. This feature protects your notebook by saving all information in RAM (random access memory) to a hibernation file on the hard drive and shutting down the notebook.
279359-001.book Page 1 Thursday, May 16, 2002 10:15 AM 2 A Look at the Notebook Display Components Identifying display components 1 Display release latch Opens the notebook. 2 MultiPort Supports an optional USB-enabled wireless device such as a Bluetooth, 802.11 wireless LAN, or PC Smart Card Reader module.
279359-001.book Page 2 Thursday, May 16, 2002 10:15 AM A Look at the Notebook Pointing Device Components Pointing Stick Model Identifying pointing stick components 1 EasyPoint IV 3D Pointing Stick 2 Left and right pointing-stick buttons 3 Scroll pointing-stick button 2–2 Moves the pointer and selects or activates items on the screen. Function like the left and right buttons on an external mouse. Functions like the scroll button on an external mouse.
279359-001.book Page 3 Thursday, May 16, 2002 10:15 AM A Look at the Notebook TouchPad Model Identifying TouchPad components 1 TouchPad Moves the pointer and selects or activates items on the screen. Can be set to perform other mouse functions, such as scrolling, selecting, and double-clicking. 2 Left and right TouchPad Function like the left and right buttons on an external mouse.
279359-001.book Page 4 Thursday, May 16, 2002 10:15 AM A Look at the Notebook Dual Pointing Device Model Identifying dual pointing device components 1 Pointing stick Moves the pointer and selects or activates items on the screen. 2 Left and right pointing-stick Function like the left and right mouse buttons on an external mouse. buttons 3 TouchPad Moves the pointer and selects or activates items on the screen.
279359-001.book Page 5 Thursday, May 16, 2002 10:15 AM A Look at the Notebook Top Components Speakers and Memory Compartment Identifying the speakers and memory compartment 1 Stereo speakers (2) Produce stereo sound. 2 Memory expansion Contains 2 memory expansion slots for optional memory expansion boards.
279359-001.
279359-001.book Page 7 Thursday, May 16, 2002 10:15 AM A Look at the Notebook Lights (Continued) 1 Caps lock light On: Caps lock is on. 2 Scroll lock light On: Scroll lock is on. 3 Num lock light On: Num lock is on or the embedded numeric keypad is enabled. 4 Power/standby light On: Power is turned on. Blinking: Notebook is in Standby.
279359-001.book Page 8 Thursday, May 16, 2002 10:15 AM A Look at the Notebook Buttons, Keys and Switches Identifying buttons, keys and switches on the top of the notebook 1 Standby button Initiates and resumes from Standby. 2 Easy Access Buttons (4) Programmable buttons that provide quick access to Internet or network destinations, or to software applications or data files in the system. 3 Power switch Turns the notebook on or off or resumes from Hibernation.
279359-001.book Page 9 Thursday, May 16, 2002 10:15 AM A Look at the Notebook Left Side Components Identifying left side components 1 Exhaust vent Allows airflow to cool internal components. prevent overheating, do not Ä Toobstruct vents. Using the notebook on a soft surface, such as a pillow, blanket, rug, or thick clothing, may block airflow. 2 Hard drive bay Holds the primary hard drive. 3 PC Card slots (2) Support optional Type I or Type II 32-bit (CardBus) or 16-bit PC Cards.
279359-001.book Page 10 Thursday, May 16, 2002 10:15 AM A Look at the Notebook Right Side Components Identifying right side components 2–10 1 Security cable slot Attaches an optional security cable to the notebook. 2 MultiBay Supports an optional MultiBay device, such as a drive or battery pack. 3 RJ-11 jack Connects the modem cable.
279359-001.book Page 11 Thursday, May 16, 2002 10:15 AM A Look at the Notebook Front Panel Components Identifying front panel components 1 Infrared port Links another IrDA-compliant device for wireless communication. 2 Intake vent Allows airflow to cool internal components. overheating, do Ä Tonotprevent obstruct vents. Using the notebook on a soft surface, such as a pillow, rug, or thick clothing, may block airflow. 3 Volume buttons (2) Adjust system volume.
279359-001.book Page 12 Thursday, May 16, 2002 10:15 AM A Look at the Notebook Rear Panel Components Identifying rear panel components 1 DC power connector Connects an AC Adapter or an optional Automobile Power Adapter/Charger, Aircraft Power Adapter, or DC cable. 2 Keyboard/pointing device Connects an optional PS/2 device such as a keyboard or mouse. (PS/2) connector connect a keyboard and ✎ To a mouse at the same time, use an optional Y-adapter.
279359-001.book Page 13 Thursday, May 16, 2002 10:15 AM A Look at the Notebook Bottom Components Identifying bottom components location of the Certificate of Authenticity label 9 may vary ✎ The by model and configuration. Bottom Components 1 MultiBay recess Provides a grip area for removing an optional MultiBay device from the MultiBay. 2 MultiBay release latch Releases an optional MultiBay device from the MultiBay. 3 System label Provides regulatory information about the notebook.
279359-001.book Page 14 Thursday, May 16, 2002 10:15 AM A Look at the Notebook Bottom Components (Continued) 4 Serial number Identifies the notebook. may need this number if ✎ You you call Compaq customer support. 5 Docking restraint latch recess 6 Intake vents Helps secure the notebook to a Port Replicator. Provide airflow to cool internal components. overheating, do Ä Tonotprevent obstruct vents. Using the notebook on a soft surface, such as a pillow, rug, or thick clothing, may block airflow.
279359-001.book Page 15 Thursday, May 16, 2002 10:15 AM A Look at the Notebook Additional Standard Components The components included with the notebook vary by geographical region and the notebook hardware configuration ordered. The following illustration and table identify the standard external components included with most notebook models.
9359-001.book Page 16 Thursday, May 16, 2002 10:15 AM A Look at the Notebook Additional Standard Components 1 Power cord Connects the AC Adapter to an AC electrical outlet. 2 Modem cable Connects the modem to an RJ-11 telephone jack or to a country-specific modem adapter. modem cable has a ✎ The 6-pin RJ-11 connector at each end. 3 Country-specific modem adapter (included with internal modem models by region as required) 4 Network cable Adapts the modem cable to a non-RJ-11 telephone jack.
279359-001.book Page 17 Thursday, May 16, 2002 10:15 AM A Look at the Notebook Additional Standard Components (Continued) 8 Documentation Library CD Contains the following guides: ■ Hardware Guide ■ Software Guide ■ Modem and Networking ■ Modem Command Guidelines (Advanced Users Only) ■ Maintenance, Shipping and Travel ■ Troubleshooting ■ Regulatory and Safety Notices ■ Safety & Comfort Guide 9 QuickRestore kit Contains the software preinstalled on the notebook.
279359-001.book Page 1 Thursday, May 16, 2002 10:15 AM 3 How to Get Information, Help and Updates Using the Documentation Library CD Included with the notebook is the Documentation Library CD, which contains detailed information and instructions for using your notebook: ■ Hardware Guide—Contains information specific to your notebook.
279359-001.book Page 2 Thursday, May 16, 2002 10:15 AM How to Get Information, Help and Updates ■ Regulatory and Safety Notices—includes governmental agency information. ■ Safety & Comfort Guide—describes the best ways to set up a safe and comfortable work environment, including ergonomic and safety information. Viewing Guides on the CD To view a guide: 1. Insert the Documentation Library CD into the CD drive.
279359-001.book Page 3 Thursday, May 16, 2002 10:15 AM How to Get Information, Help and Updates Contacting Technical Support If you cannot solve a problem using the documentation provided with the notebook, you may need to call technical support. Refer to Worldwide Telephone Numbers booklet included with the notebook, for the phone number of a Compaq office near you, or visit: http://www.compaq.
279359-001.book Page 4 Thursday, May 16, 2002 10:15 AM How to Get Information, Help and Updates Updating Compaq Software For optimal notebook performance and to make sure your notebook remains compatible with changing technologies, Compaq recommends that you install the latest versions of Compaq software as they become available. To update Compaq software: 1. Obtain the Compaq Support Software CD. 2. Download software updates from the Compaq Web site.
279359-001.book Page 5 Thursday, May 16, 2002 10:15 AM How to Get Information, Help and Updates Obtaining the Compaq Support Software CD The Compaq Support Software CD provides the latest Compaq software and instructions for installing and using it. The CD includes device drivers, ROM updates, and utilities.
279359-001.book Page 6 Thursday, May 16, 2002 10:15 AM How to Get Information, Help and Updates Displaying ROM Information in Computer Setup Computer Setup is a non-Windows utility. For general information about using Computer Setup, refer to the “Setup and Diagnostics Utilities” chapter in the Software Guide on the Documentation Library CD included with the notebook. To display ROM information in Computer Setup: 1. To open Computer Setup, turn on or restart the notebook.
279359-001.book Page 7 Thursday, May 16, 2002 10:15 AM How to Get Information, Help and Updates Downloading System ROM Ä CAUTION: To prevent an unsuccessful installation, download and install the system ROM only while the notebook is connected to reliable external power using the AC Adapter. Do not download or install a system ROM while the notebook is running on battery power, docked in an optional Port Replicator, or connected to an optional power source.
279359-001.book Page 8 Thursday, May 16, 2002 10:15 AM How to Get Information, Help and Updates 6. In the Compaq folder, select the name or number of the software package containing the system ROM update. The system ROM installation begins. 7. To complete the installation, follow the instructions on the screen. a message on the screen reports a successful installation, ✎ After you can delete the download package from the Compaq folder. Downloading Other SoftPaqs To update other SoftPaqs: 1.
279359-001.book Page 9 Thursday, May 16, 2002 10:15 AM How to Get Information, Help and Updates Restoring Software The QuickRestore kit included with the notebook provides all the software that shipped preinstalled or preloaded on your notebook and instructions for restoring it. You can use QuickRestore to install or reinstall individual software items, such as applications, or to restore the entire notebook factory image. The factory image is the original software on your notebook when it was shipped.
279359-001.book Page 10 Thursday, May 16, 2002 10:15 AM How to Get Information, Help and Updates Installing a Retail Version of an Operating System A Windows operating system provided on the notebook or on a QuickRestore CD is enhanced by Compaq. The Compaq enhancements add power and security features and provide supplementary support for external devices such as drives and PC Cards.
279359-001.book Page 1 Thursday, May 16, 2002 10:15 AM Index A C AC Adapter connecting 1–2 function of 2–16 adapter for AC power cord. See AC Adapter Adobe Acrobat Reader 3–2 Aircraft Power Adapter (optional) 2–12 application key 2–8 AT commands 3–1 Automobile Power Adapter/Charger (optional) 2–12 cable AC Adapter 1–2 DC 2–12 modem 2–16 modem vs.
279359-001.book Page 2 Thursday, May 16, 2002 10:15 AM Index Computer Setup displaying ROM information with 3–6 connectors DC power 1–2, 2–12 external monitor 2–12 keyboard/pointing device 2–12 keyboard/pointing device (PS/2) 2–12 parallel 2–12 serial 2–12 See also jack cord.
279359-001.
279359-001.
279359-001.
279359-001.