
Installation guide


Installing on Windows NT/2000
2.3 Post-Installation
Rev. 1/9/01–A
2–22 Web-Based Enterprise Service Installation Guide
2.2.4 Finishing the WEBES Installation
The InstallShield kit exits when WEBES installation completes. See the Post-Installation
information in the next section for additional instructions.
2.3 Post-Installation
Be aware of the following post-installation procedures.
2.3.1 Setting Permissions
You must set permissions after WEBES has been initially installed and the director process has
been started.
Windows NT
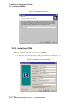
1. Under Control Panel | Services, select the DESTA director service.
2. Click Startup...
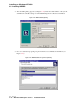
3. Under Log On As: select the This Account: option.
4. Click the [...] button and select the account that you normally use to log in to Windows.
Press Add, then OK to close the window.
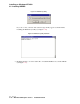
5. Your account name has been placed in the This Account: field. In both Password: fields
underneath, enter the password for that account.
6. Click OK.
7. Close the Services window and Control Panel.
Windows 2000
1. On the desktop, right click “My Computer” and highlight Manage from the pop-up menu.
2. The Computer Management window appears. Choose Services and
Applications | Services.
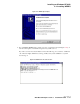
3. In the list of services, right click Desta_Service and highlight Properties from the pop-up
menu.
4. Highlight the Log On tab.
5. Highlight the This Account radio button.
6. Enter the account name and password that you normally use to log in to Windows.
7. Click OK.
8. Close the Computer Management window.