
Installation guide


Installing on Windows NT/2000
2.2 Installing WEBES
Rev. 1/9/01–A
2–6 Web-Based Enterprise Service Installation Guide
2.2 Installing WEBES
After all Pre-Installation requirements are met, follow these steps to install WEBES. Be aware
that installing on a system where a previous profile was saved can shorten many of the
questions regarding names, addresses, hardware serial numbers, and so on. You can change the
old values if desired, or simply reconfirm them.
1. If you have not already done so, log on using an account with administrator privileges.
2. Run the appropriate executable file for your platform:
WEBES_IV<version number>.EXE (for Intel architecture)
WEBES_NV<version number>.EXE (for Alpha architecture)
You can double-click the file in the Windows Explorer window, or use Start | Run from
the Windows desktop.
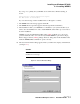
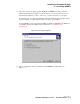
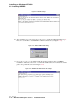
3. If it is necessary to update certain system DLL files (msvcrt.dll, msvcirt.dll, and
msvcp60.dll), the prompt shown in Figure 2–1 appears. Otherwise, the installation
proceeds with step 7.
Figure 2–1 DLL Update Prompt
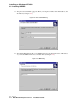
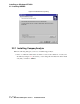
4. Click Yes. You must restart the system to continue (see Figure 2–2).
Figure 2–2 Restart Prompt
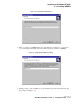
5. Click OK.
6. The system restarts, and the log on dialog appears. Wait a few moments for system
services to finish starting, and then log on.