
Installation guide


StorageWorks Secure Path for Windows NT
6-6 123995-002 EK-WNTMP-MH. D01
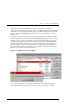
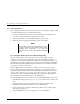
The port/bus/target/lun information refers to the physical identity of the drive’s
corresponding storageset (unit) as designated by the RAID Array subsystem. The disk #
refers to the number assigned to a drive by Windows NT’s Disk Administrator and the
drive letter, appearing above the drive icon, is assigned to that partition (if one exists). If a
drive has more than one partition they will appear above the drive as well. This drive
information should allow you to quickly map storageset to operating system identity and
determine which storagesets are currently serviced through each path.
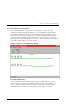
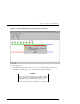
6.5 Assigning New Primary Paths to Drives
To assign a new primary path to a drive using the Manager, proceed as follows:
1. Use the left mouse key to select the icon of the disk that is to receive a new primary
path assignment (the icon will become a null-circle when selected).
2. Drag the disk icon from its current primary path to the alternate path displayed on the
screen.
3. Drop the disk icon, anywhere you see the squared arrow along the “new” primary
(formerly alternate) path, by releasing the mouse key. (The icon turns gray while in
transition, and the cursor becomes an hour-glass).
When the primary path re-assignment of a disk completes, its icon will appear in its
original form, shaded gray and yellow, on the new path. (It may appear above or beneath
the path line, depending on your exact placement of the mouse). Repeat this procedure for
each disk that is to be assigned a new primary path. A maximum of 24 drives can be
assigned between both paths.
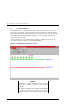
The Secure Path Manager will not permit a new primary path assignment to a failed path.
If an attempt is made to move a drive to a failed path the Manager will return the drive to
the original path. A popup will also appear stating that the move was not successful.
NOTES
The display is refreshed every 90 seconds, and can be
refreshed immediately using the View/Refresh pull-down
menu of the Manager window or by depressing the F5 hot
key.