
Specifications


Configuring and Installing Components 5-37
1.
Shut down the operating system and turn off power to the system. Unplug
the power cord from each power supply.
2.
Remove the cover to the PCI card cage area.
3.
Unplug the signal and power cables to the CD.
4.
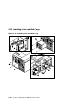
Remove and set aside the four screws
➊ securing the removable media cage.
Remove the cage.
CAUTION: Be careful not to tangle the wires to the CD-ROM and floppy.
5.
Remove a blank storage panel ➋ for the desired storage slot by pushing
from behind the panel. If you are installing a full-height device, remove two
panels.
If you are installing a full-height device, also remove the divider plate
between the top two slots
➌ by pressing the center of the plate and bending
it sufficiently to free it from the slots.
6.
Set the SCSI ID on the device as desired.
7.
Slide the storage device into the desired storage slot and secure the device
to the unit with four of the screws
➍ provided inside the removable media
drive cage.
8.
Slide the removable media cage back in and replace the four screws set
aside previously.
9.
Plug in the signal cable
➎, route it into the PCI cage, and attach it to the
appropriate controller.
10.
Plug the power cable (4-conductor)
➏ into the storage device.
11.
Plug the signal and power cables back into the CD.
12.
Replace the PCI card cage cover and enclosure covers.
13.
Reconnect the power cords.
Verification — SRM Console
1.
Turn on power to the system.
2.
When the system powers up to the P00>>> prompt, enter the SRM show
device command to determine the device name. For example, look for dq,
dk, ew, and so on.