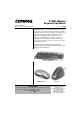
27MHz Wireless Keyboard and Mouse OWNER’S MANUAL — Please read before using this equipment. 26-750 Thank you for purchasing the Compaq 27 MHz Wireless Keyboard and Mouse. The wireless keyboard lets you move it freely from your computer within 2 meters range and the keyboard’s 19 hot keys are convenient for one touch access to your favorite Internet, e-mail, and programs such as Word, Excel, and Power Point.
CONTENTS System Requirements .................................................................................................................................. 3 A Quick Look ................................................................................................................................................ 4 Mouse ....................................................................................................................................................... 4 Keyboard Hotkeys .............
SYSTEM REQUIREMENTS TM • IBM -Compatible PC, with 80486 processor or above • 8 MB RAM minimum (16 MB recommended) • 10 MB hard-disk space • CD-ROM drive • PS/2 keyboard port. (If your system has an AT computer (IBM compatible) keyboard port, you will need one more AT socket to PS/2 socket adapter, available at your local RadioShack store.) • PS/2 mouse port. • Windows 95 (PS/2 only) Microsoft Windows 98/Me, or Windows NT 4.0 (with Service Pack 3 or later version), or Windows 2000/XP installed.
Mouse Scroll Wheel — lets you scroll and select quickly and easily, helping you work with long documents. Supplied Driver CD — provides various customized functions for operation with the Internet and Windows. A QUICK LOOK MOUSE Left Mouse Button Side Button Side Button Scroll Button Right Mouse Button Left Button: The left button is a default click button. You do not need to set this button.
KEYBOARD HOTKEYS Media Keys — starts the media player that you select. F — moves audio or video CD to previous track. J — moves an audio or video CD to the next track. 9 — Play and pause an audio or video CD. D — stops playing an audio or video CD. Volume + or – ] — increases or decreases volume. Mute — mutes the sound of an audio or video CD being played. Internet Keys My Favorites — displays your Favorites or Bookmarks list for the Internet. Search — goes to your Internet search service.
• lights red when the keyboard battery power is low. The LED only flashes when a key is pressed on the keyboard while the batteries are low. • flashes green slowly when the receiver is preparing to operate. • flashes green rapidly when the mouse moves and goes off when the mouse stops. • flashes green slowly when you hit a key on the keyboard and goes off when you stop. 2. The second green LED lights when Scroll Lock is set to on and turns off when Scroll Lock is released. 3.
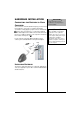
HARDWARE INSTALLATION CONNECTING THE RECEIVER TO YOUR COMPUTER The connectors of the RF (Radio Frequency) receiver meet the PC 99 Spec. If you have a computer with PC 99 specification, simply plug the purple connector marked with to the same color PS/2 port, or connect the supplied USB to PS/2 adapter to the USB connector and connect it to the mouse’s USB port. Refer to your computer’s manual for the location of PS/2 ports.
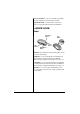
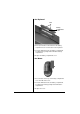
In the Keyboard Tabs Battery Compartment Cover 1. Push up on the tabs to lift and remove the battery compartment cover on the bottom of the keyboard. 2. Insert two AA batteries into the battery compartment according to the polarity marked inside the battery compartment. 3. Replace the battery compartment cover. In the Mouse 1. Press the latch on the top of the battery compartment cover. Then lift off the cover. 2.
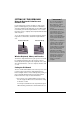
SETTING UP THE KEYBOARD Using the Keyboard’s Palm Rest and Elevation Tabs If your desktop space is large enough, you may use the palm rest which supports your forearms for comfortable operation. Simply turn the keyboard over, then lift the palm rest towards you. Turn the keyboard back over. To return the palm rest to it’s original position, flip it backwards until it clicks into place. ! IMPORTANT ! • Do not use the keyboard or mouse on a desk made of glass, mirror, iron, or black velvet.
2. Press the channel button on the bottom of the wireless mouse. The top green LED indicator on the receiver flashes. 3. Press the channel button on the bottom of the wireless keyboard. The top green LED on the receiver flashes. Ô NOTE Ô • You must reset the ID channel each time you change the batteries. Your wireless keyboard and optical mouse channel automatically select one of the 256 ID codes after you press both channel buttons.
Customizing the Mouse Settings To open the Mouse Properties dialog box for customizing the mouse setting, double-click in the task bar or click Windows /Start /Programs /Scroll Mouse Control Panel (“Mouse Properties” setting menu). Mouse Button Assignments The Button Assignments’ function in the Mouse Properties Settings tab lets you set the mouse button function in a more efficient way. You can assign the most frequently used commands in Windows to the mouse buttons.
Browsing Speed — Adjust your browsing speed to the desired setting. Browsing Direction — Adjust your browsing direction to scroll either forward or backward when you move the scroll wheel. Button Find — Automatically positions the cursor on the default button (usually OK or Enter) when the dialog box appears on your screen. Trails — This option makes it easier to find the cursor when using an LCD monitor. This option cannot be used if your monitor does not support it.
Pointers — Customize cursor appearance or select to use the default settings. Office Mode — Only supports Microsoft Office along with some new applications. Features include zoom, scrolling and Auto-scrolling. It is similar to Microsoft’s IntelliMouse. Scroll Mouse Mode — supports all applications that use scroll bars, including Office, with zoom, Auto-panning, and scrolling functions. This is the default setting.
About — This tab lists the product, version, and copyright information. EasyJump for Windows Click EasyJump Options on the Settings tab. The Easy Jump Options dialog box appears.Ô Ô NOTE Ô Some panels inside the EasyJump circle might appear gray (disabled). This is because your application software does not support those functions. The horizontal and vertical scroll bars only operate on documents that support the driver such as Microsoft Word, Excel, Notepad, and Wordpad.
Vertical — Moves the cursor to the vertical scroll bar. Start — Activates the Windows Start menu. Internet Access — This function opens the Browser to access the Internet. Help — This opens the computer’s Help & Support menu. Control Panel — Opens the mouse’s control panel (Mouse Properties dialog box). Auto-Panning — You can set this function in the Button Assignments menu. Move the mouse, and the document moves in the direction you just moved.
Setting the Media Key 1. Double-click on the Windows task bar to display the HotKey menu. 2. Click the Media tab and select List Supported Media Player or Eject/Insert CDROM, then click Apply then OK. 3. To perform the selected function, press on the keyboard. Then follow the on screen instructions. Setting the Play/Pause Key 1. Double-click on the Windows task bar to display the HotKey menu. 2.
Setting the Search Key 1. Double-click on the Windows task bar to display the HotKey menu. 2. Click the Search tab to select the web site or function you want for the Search key. Then click Apply then OK. 3. To perform the selected function, press keyboard. on the Setting the Web/Home WWW Key 1. Double-click on Windows task bar to display HotKey menu. 2. Click the Web/ Home tab to select the Microsoft Internet Explorer, Program, Web Site, Menu functions you want for the Web/ Home key .
Setting the Mail Key 1. Double-click on the Windows task bar to display the HotKey menu. 2. Click the Mail tab to select Microsoft Outlook Express, Microsoft Outlook, Program, Web Site, and Menu functions you want for the Mail key . Click Apply then OK. 3. To perform the selected function, press keyboard. on the Setting the “My Computer” Key 1. Double-click on Windows task bar to display the HotKey menu. 2.
Setting the Calculator Key 1. Double-click on the Windows task bar to display the HotKey menu. 2. Click on the Calculator tab and select Windows Calculator, Program, Web Site, Menu functions you want for the Calculator key . Click Apply then OK. 3. To perform the selected function, press keyboard. on the Setting the Sleep Key For computers running Windows 95 (PS/2 only) or Windows NT version 4.
3. To perform the selected function, press keyboard. on the Setting Options for Displaying the HotKey Icon 1. Double-click HotKey menu. on the Windows task bar to display the 2. Click the Options tab to select “Show on-screen key effects” and/or “Show icon in the task bar”. If you select “Show onscreen key effects” only, the keyboard icon will not appear. 3. To access HotKey menu, double click To directly access the HotKey setting for Search, WebHome/Mail/My computer/Calculator, click .
2. Click the Wireless tab to select showing Caps Lock, Num Lock, and Scroll Lock icons in the task bar, then click Apply.
TROUBLESHOOTING Problem Possible Reason Solution No batteries are installed in the wireless keyboard and mouse or the batteries are installed incorrectly. Install fresh batteries or reinstall the batteries facing the correct directions. The receiver for the wireless keyboard and mouse are incorrectly connected to your computer. Make sure the green connector goes to the mouse port and the purple connector goes to the keyboard port.
FCC DECLARATION OF CONFORMITY This device complies with Part 15 of the FCC Rules. Operation is subject to the following two conditions: (1) this device may not cause harmful interference, and (2) this device must accept any interference received, including interference that may cause undesired operation.
Environment Requirements In order to keep your wireless keyboard and mouse in the perfect performance and avoid the unnecessary damages, please read the following cautions: • Do not use the device in a damp environment, such as a bathroom, a damp basement, a swimming pool, etc. • Do not try to repair the device by yourself. • Under the following circumstances, have the device repaired by qualified personnel. The cable or plug is damaged or worn. Liquid has entered the device.