
User's Manual
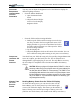
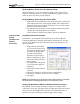

Table Of Contents
- User Guide
- About This User Guide
- Chapter 1 Getting Started with Motion M1200 and M1300 Tablet PCs
- Chapter 2 Motion M1200 and M1300 Tablet PC Hardware
- Chapter 3 Motion M1200 and M1300 Tablet PC Software
- Chapter 4 Using Your Motion M1200 and M1300 Tablet PCs
- Initializing Microsoft Windows XP
- Starting and Stopping Your Tablet PC
- Opening the Motion Dashboard
- Saving Power Using Stand By or Hibernate
- Operating the Motion M-Series Digitizer Pen
- Hints for Optimizing Your Display Window
- Making Best Use of the Tablet PC Input Panel
- Hints for Working with the Input Panel
- Eliminating Paper with Windows Journal
- Creating Forms and Editing Them in Windows Journal
- Have Sticky Notes Handy for Jotting Down Information
- Changing Screen Orientation
- Customizing Buttons
- Adjusting Brightness for Different Lighting Scenarios
- Identifying the Right AC Power Adapter
- Keeping Tabs on Your Battery Power
- Creating New Power Schemes for Special Situations
- Charging the Battery
- Changing the Battery
- Adding Memory to Improve System Performance and Increase Battery Life
- Selecting Correct Cables for Operating Optical Disk Drives
- Installing Optical Disk Drives
- Cloning and Extending Your Display for Additional Viewing
- Setting Up a Wireless Connection
- Setting Up Speech Recognition for Dictation
- Using Speech Recognition for Commands
- Changing Screen Resolution for Using an External Monitor
- Creating a Screen- Resolution Scheme for an External Monitor or Similar Device
- Multimedia Applications
- Setting Up Tablet PC Security
- Clearing Tablet PC Security
- Caring for Your Tablet PC and Its Accessories
- Traveling With Your Tablet PC
- Appendix A Regulatory Compliance Notices
- Appendix B Troubleshooting and Support
- Appendix C Safety
- Appendix D Motion M1200 and M1300 Specifications
- Appendix E Limited Warranties

Chapter 4
Using Your Motion M1200 and M1300 Tablet PCs
Motion Computing M1200 and M1300 Tablet PC User Guide 39
8. With the replacement battery close at hand, push the battery release
latch on the bottom of the Tablet PC to eject the internal battery.
9. Insert the new battery until you hear the latch click, which ensures
the new battery is correctly seated.
CAUTION: To avoid damage to the Tablet PC, install only Motion
Computing batteries, which are specially designed for the Tablet PC.
Disposing of Used Batteries
When an Tablet PC battery is no longer serviceable, dispose of it responsibly
at a hazardous materials recycling center. Do not toss it in the trash where it
will be sent to a landfill.
Battery and Power Management Hints
• Use AC power whenever available to lengthen the battery’s usable
life. Leave the battery in place when using AC power.
• Use AC power when installing software or writing to a CD and, for
best performance, when using a DVD player.
• Whether using AC or battery power, when leaving the Tablet PC
unattended, place the system in Stand By or Hibernate mode.
• Keep in mind that the display, processor, PC cards, wireless cards, and
accessory drives all draw on the battery, so adjust properties and
disable unused accessories and PC cards when operating on
battery power.
• When running on battery, adjust the power mode and display
brightness to lower settings to prolong the
battery’s charge.
ADDING
MEMORY TO
I
MPROVE
SYSTEM
P
ERFORMANCE
AND INCREASE
B
ATTERY LIFE
Use only Motion M-Series Memory modules obtained from Motion
Computing to upgrade the factory-installed memory.
WARNING: To avoid the risk of personal injury or damage to the Tablet
PC, when performing the following tasks, turn off your Tablet PC, unplug
the AC power connection, and remove the battery. Ground yourself by
touching the Tablet PC. Avoid touching the pins and leads on the
memory and the internal circuitry of the Tablet PC.
1. After you disconnect power, unscrew the L-
shaped cover from the bottom of the Tablet PC.
2. If you are replacing a module, release the clips
on each side of the module and lift to remove it.
3. Align the pins on the Memory Upgrade module
with the receptors on the slot.
4. Gently push the new module into the slot at a
25-degree angle until it is firmly seated; then rotate it into place.
5. Replace the external cover and install the two screws.