
Operating Instructions and Installation Instructions


ComNav Vector G2 & G2B Installation & Operation Appendices
Document PN 29010078 V2.0 - 71 -
DRAFT #3 – 29 May 2009
Appendix 2
Setting Up & Using HyperTerminal
This section describes the basic procedures for using HyperTerminal with a Vector G2.
• Most of the screen shots and examples of typical data & commands in this section
were taken while running the standard HyperTerminal
21
program on a newer PC
(running a Core2 Quad CPU, Windows XP Pro 32-bit SP3, and an LCD display at
1600 x 1200). The PC ⇔ G2 connection (on the G2’s RS-232 ports) was via two
generic USB-to-Serial adapters set up for COM 5 & 6. The G2B’s Port A was
connected to COM 5, and Port B to COM 6.
• The two detailed ports’ examples were taken on an older laptop (Celeron CPU,
Windows XP Pro SP3, LCD display 1024 x 768). The G2B’s RS-232 ports were
connected via a generic 4-serial-input to USB adapter; Port A was mapped to COM4,
Ports B to COM5.
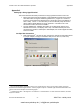
Set Up a New Connection
• Start Hyperterminal
22
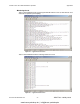
, and give the new connection a name & Icon that makes sense
to you (for example, to help you remember what port it is used on, in later use):
Figure 21 – New Connection Dialog Box
21
There is a Private Edition (available for free for non-commercial use), which you may wish to obtain; it has more
features that the standard HyperTerminal – see the program’s Help info. Note that HyperTerminal Private Edition was
used for some of the examples on the following pages.
22
In Windows XP: Start ⇒ All Programs ⇒ Accessories ⇒ Communications. In other versions of Windows, the menu
sequence is similar.
www.busse-yachtshop.de | info@busse-yachtshop.de