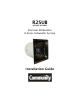
R2SUB R2SUBZ, R2SUBDF Premium All-Weather R-Series Subwoofer System Installation Guide
EC STATEMENT OF CONFORMITY This document confirms that the range of products of Community Professional Loudspeakers bearing the CE label meet all of the requirements in the EMC directive 89/336/EEC laid down by the Member States Council for adjustment of legal requirements. Furthermore, the products comply with the rules and regulations referring to the electromagnetic compatibility of devices from 30-August-1995.
WELCOME TO COMMUNITY! Since 1967, Community has been designing and building innovative loudspeaker products for the worldwide sound reinforcement industry. Founded by Bruce Howze, who remains the principal designer to this day, the company has achieved numerous ‘firsts’ in technology breakthroughs. Some of these include: First - fiberglass composite loaded midrange horn for touring systems – the LMF. First - large-scale fiberglass horns used on Elvis Presley’s 1971 tour.
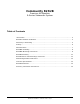
Community R2SUB Premium All-Weather R-Series Subwoofer System Table of Contents Introduction .................................................................................................. 5 R2SUB Installation Guidelines .......................................................................... 5 Directivity & Positioning .................................................................................. 5 Polarity ..........................................................................................
Introduction The Community R2SUB is a powerful dual 12-inch subwoofer system, offering all the weather-resistant features and benefits of the acclaimed R-Series. The 400-watt R2SUB subwoofer includes two 12-inch drivers and can be flown or down-fired for flexible system configuration. Featuring Community’s bulletproof DYNA-TECH protection circuitry, the R2SUB is engineered to provide quality low frequency reproduction in a wide variety of outdoor and indoor environments.
likely to occur. If the wall or corner location is too far away from the full-range loudspeaker(s), it may result in the R2SUB being drastically out of time sync with one or more of the full-range speakers. Sometimes the sound quality of a wall or corner placement is not desirable, simply due to the room’s acoustical properties. Keep in mind that when wall and corner locations are appropriate for use, they offer a tremendous increase in power output; however, they may not always be the best choice.
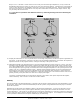
One polarity (either normal or reversed) should result in a discernable cancellation through the crossover region, while the opposite polarity should result in either a flat response or a peak through the crossover region. Note: When experimenting to determine the proper polarity, reverse only the full-range loudspeaker(s) or the subwoofer, never both at the same time.
Although it’s easy to simply reverse the phase of the subwoofer to determine its best phase relationship to the full-range speaker system, if the best position turns out to be reversed we recommend that you instead reverse the full-range system(s) so that the subwoofer(s) can remain in a state of positive absolute phase.
3. Fasten the Surface Bracket part of each of the four brackets to the mounting surface using a suitable fastener. Suggested fastener types and minimum sizes are as follows: Wood: Lag bolts of three-eighths inch diameter (3/8”) or larger, by two-inches (2”) in length (or longer). Metric equivalent is 10mm x 50mm. Make sure to drill a pilot hole to avoid breaking the lag bolt when tightening. Steel Panel: 3/6-16 machine bolts (or larger) secured with flat washers, lock washer, and hex nuts.
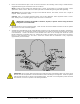
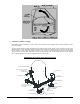
6. Installation on Walls or Ceilings If the R2SUB is to be installed on a wall or ceiling, the two stainless steel Support Struts must be utilized to insure structural integrity. The two Support Struts should be positioned on two opposite sides of the R2SUB. First, attach the end of a strut with the hole in it to the Mounting Bracket using the same carriage bolt that holds the two parts of the Mounting Bracket together.
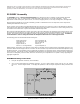
R2SUBZ Assembly The R2SUBZ includes a weather-resistant U-shaped mounting yoke for mounting R2 systems. When properly utilized, the mounting yoke allows your R2SUB loudspeaker to be properly aimed in virtually any direction. CAUTION: The R2 Mounting Yoke is specifically designed to provide a high degree of safety in R2 installations. It is highly recommended for mounting an R2.
R2SUB with R2 Yoke Mounting Instructions Normally the yoke should first be attached to the R2SUB then the entire assembly mounted to a structure. However in the some unusual cases it may be desirable to mount the yoke and secure it in place before mounting the R2SUB to the yoke. Depending on the situation the sequence of the following mounting procedure may have to be modified to facilitate the work. Nonetheless the instructions and precautions about use of the hardware should still be followed. 1.
Maintaining Weather-Resistance There are several things that must be observed when installing an R2SUB in order to maintain its weather-resistant integrity for outdoor use. 1. Always orient the loudspeaker so the mouth of the horn is, at a minimum, pointing slightly downward. Failure to do this will result in water collecting inside the bell of the horn. 2. When handling an R2SUB be careful not to scratch or scrape the powder coat finish on the perforated metal grille.
R2SUBZ Dimensions 30.75" [781.05] 17.25" [438.15] 24.75" [628.7] YOKE 24.75" [628.7] (5) 1/2-13THREAD SIDE VIEW TOP VIEW FRONT VIEW 3.622" [92] .236" [6] (TYP) 7.992" [203] 7.992" CL [203] 1.220" [31] ∅.532" [∅13.5] (TYP 7 PLACES) 16.693±.079" [424±2] .472" [12] 1.220" [31] (TYP) 1.260" [32] 21.000" [533.4] R2 YOKE R2SUBDF Dimensions 32.750" [831.86] 25.000" [635] 25.
Warranty Information And Service Transferable Warranty (Limited) – Valid in the USA Only Community loudspeaker systems are warranted in the USA to be free from defects in materials and workmanship for a period of five years, as determined by one of the following two methods, whichever is longer: 1. Starting from the date of retail purchase, as noted on the sales receipt from an authorized Community dealer, OR 2.
Community Professional Loudspeakers 333 East Fifth Street, Chester, PA 19013-4511 USA Tel: (610) 876-3400 | Fax: (610) 874-0190 www.communitypro.