
Operating instructions


Page 8
R.5-MAX, R2-MAX
Installation and Operation Manual
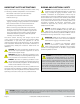
Attach the 1/4" hardware to the holes
that best match the angle desired
1/2" x 2"
SS Hex Bolt
1/2" SS
Lock Washer
1/2" SS
Flat Washer
1/2"-13
SS Hex Nut
Yoke
Angle
Securing Strap
Figure 5a. Attach the securing strap to the yoke
Figure 5c. Attach the securing strap to the contour strap
Contour Strap
Angle Securing Strap
1/4" x 1" SS Hex Bolt
1/4" SS Lock Washer
1/4"-20 SS Hex Nut
1/4" SS Flat Washer
1/4"-20 SS Hex Nut
R2-MAX INSTALLATION (cont'd)
q Mount the R2-MAX and yoke to the support structure.
If the center hole is being used to mount the yoke, that
hardware must be installed before attaching the securing
strap to the yoke. All mounting hardware must be supplied
by the installer and be weather-resistant and properly
rated for the weight and potential wind load by a structural
engineer.
2" OD Rubber Gasket
1/2" x 1-1/4" SS Hex Bolt
1/2" SS Lock Washer
1/2" SS Flat Washer
Contour Strap
Figure 5b. Attach the contour strap to the enclosure
q Determine the approximate angle of downward tilt and
adjust the angle accordingly. It must be angled at least 5°
down from horizontal to maintain the stated enclosure
EIEMA rating and reduce the possibility of rain and other
precipitation compromising the performance. Once the
aiming angle is set, bend the securing strap against the
contour strap. The series of holes in the securing strap
should line up with one of the three 5/16" (8 mm) holes
in the contour strap. This determines where to locate the
bolt in the contour strap to attach the securing strap. Lift
the contour strap away from the R2 enclosure and put
the 1/4"-20 x 1" (25 mm) stainless steel bolt in this hole
so that the bolt head is between the contour strap and
the enclosure. Secure it with a lock washer and hex nut as
shown at right
q Fully attach the securing strap to the contour strap as
shown in Figure 5c. First ensure that the loudspeaker is
aimed at the appropriate angle. Bend the securing strap
towards the enclosure to put it on the bolt previously
installed on the contour strap. You will have to bend the
securing strap towards the enclosure to put it on the
bolt. First place one of the 1/4" flat washers on the bolt,
followed by the securing strap. Finish with the remaining
1/4" flat washer, 1/4" lock washer, then secure with a
1/4"-20 hex nut.
q Attach the free end of the contour strap to the enclosure
as shown in Figure 5b. Make sure that the rubber washer is
located between the contour strap and the enclosure.
q Attach the securing strap to the yoke. Align the short bent
end with the 9/16" hole with the yoke, and attach as shown
in Figure 5a. The securing strap should be positioned on
the yoke crossbar with the long end positioned over the
contour strap.
Fig 4b
Fig 5c
Fig 5a
Fig 5b
Figure (connection) reference key
Fig 4a