
Operating instructions


Page 6
R.5-MAX, R2-MAX
Installation and Operation Manual
INSTALLATION
BEFORE YOU START
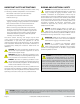
q Read all instructions and gather tools necessary before
starting the installation. Please read all safety instructions
and warnings regarding rigging and installation of the
loudspeaker. The "q" preceding each step can be used to
check o each step as it is completed (or applicable).
Every eort has been made to ensure that the information
contained in this manual was complete and accurate at
the time of printing. However, due to ongoing technical
advances, changes or modifications may have occurred that
are not covered in this publication. The latest version of this
manual is always available at www.communitypro.com.
The revision date can be found on the rear cover.
The R.5-MAX and the R2-MAX have diering mounting
instructions. Please refer to the appropriate instruction for
your loudspeaker model.
INSTALL THE R.5-MAX
MOUNT THE YOKE
Attach the yoke to the support structure prior to mounting
the loudspeaker enclosure. Five (5) integral threaded
mounting points on the four sides and the back of the
enclosure line up with the yoke or can be used for a custom
fabricated mounting. The unused holes have plugs or
hardware that can be removed if these holes are needed
for mounting or attaching the aiming strap.
Notes: The plugs are purposely designed to "catch" on the
mounting point threads and may be somewhat dicult
to remove. All unused holes must be filled with either
the supplied hardware or plugs to maintain the weather-
resistance of the enclosure. The R.5-MAX has threaded
studs rather than hex head bolts as the supplied mounting
hardware.
q Determine the appropriate location and orientation,
and mount the yoke to the support structure. Hardware to
mount the yoke to the structure is not included and should
be specified by a structural engineer, load-rated for the
intended use, and be suitably weather-resistant.
Note: If the center hole is used to mount a yoke on the
R.5-MAX, the angle securing strap must also be attached
as shown in Figure 3 prior to securing the hardware.
MOUNT THE R.5-MAX LOUDSPEAKER
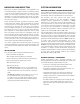
q Attach the R.5-MAX loudspeaker to the yoke. See
Figure 2. The mounting point holes are approximately
7/16" (11mm) deep. The threaded studs used should not
extend into the hole more than 3/8" (9.5mm). Lift the
loudspeaker into place between the yoke arms. Attach as
shown. Support the enclosure until all connections are
made. Tighten bolts to finger tight (enough to hold the
loudspeaker in position).
WARNING: Loudspeakers are heavy. To prevent
injury or damage, they should be supported during
the mounting process until the connection is secure.
Figure 2. Mount the R.5-MAX loudspeaker to the yoke
3/8"-16 x 1-1/4" SS Stud
(leave 3/4" sticking out)
Yoke
Enclosure
3/8" SS
Hex Nut
3/8" SS
Lock Washer
3/8" SS Flat Washer
Rigging Points
(if unused, plug with 5/16" plugs)
SECURE THE ANGLE
q Determine the approximate angle of downward tilt.
It must be angled at least 15° down from horizontal to
maintain the stated enclosure EIEMA rating and reduce the
possibility of rain and other precipitation compromising
the performance. Bend and attach the angle securing
strap(s) as shown in Figure 3. Hardware to attach the
strap to the yoke is not included and should be supplied
by the installer and be suitably weather resistant. Tighten
the yoke hardware until suciently tight enough to hold
the angle. Do not use excessive force when tightening
mounting hardware.
ATTACH SAFETY CABLE
q Attach a safety cable to one of the open mounting
points (see Product Features page 4). The safety
cable and hardware are not included. Please consult a
structural engineer for the appropriate cable for the load
and application. The safety cable must be secured to a
suitable load-bearing point separate from the loudspeaker
mounting point, with as little slack as possible, so as not to
develop undue kinetic force if the loudspeaker mount were
to fail.