
Operating instructions


Community CLOUD12 – Operation Manual - Page 26
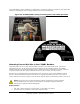
Attaching the C12SQGRL Grille to the CLOUD12/C12BB3 Assembly
Required tools:
One #2 Philips Screwdriver
Superlative vision and a flashlight to see the tiny black holes behind the grille when inserting the
screws
Safety glasses are highly recommended
Instructions for attaching the grille to the loudspeaker and backbox assembly:
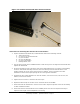
1. Unpack C12SQGRL and inspect contents to find the following:
(1) C12SQGRL white grille
(4) 8-32 x 1-1/2” Philips truss head screws
2. The C12SQGRL is provided in white. The grille can be painted if another color is desired. Use a high
quality spray paint only. Prior to painting, the surface should be treated to remove the sheen from the
polyester powder coating. This can be done with fine grit sanding or chemical sheen removers such as
trisodium phosphate. Primer and finish coat paint is applied in the same manner as other metal
surfaces. If the C12SQGRL grille is roller or brush painted, the mesh material may become clogged with
paint, resulting in attenuating of high frequencies and subsequent poor sound.
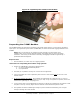
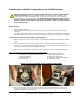
3. Please note the two locations at each corner of the CLOUD12 loudspeaker baffle plate for
attaching grilles. The holes closer to the perimeter of the baffle plate are used for the
C12SQGRL. The holes closer to the speaker cone are used for other manufacturer’s
compatible grilles.
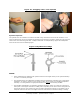
4. Place the C12SQGRL grille over the face of the CLOUD12 loudspeaker so that the edges of the grille
wrap around and conceal the edges of the baffle plate and surrounding ceiling material.
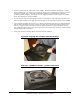
5. Line up one of the 8-32 x 1-1/2” Philips truss head screws through one hole in the C12SQGRL and insert
it into the correct hole in the CLOUD12 baffle plate. Turn the screw one or two turns to get it started.
Repeat this process for the remaining three screws.
6. Carefully snug all four mounting screws evenly so that both edges of the grille make firm contact with
surrounding ceiling material or so that the upper surface of the grille makes firm contact with the baffle
plate (for installations where the CLOUD12 speaker and backbox are installed in free space).
7. Be sure the grille is tightened enough to be securely fastened to the CLOUD12 loudspeaker, and snug
enough to the ceiling material (or the baffle) so that the grille does not vibrate.
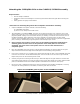
Figure
28
: C12SQGRL grille in place on the CLOUD12 assembly