
Operating instructions


Community CLOUD12 – Operation Manual - Page 21
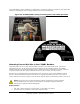
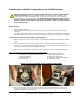
Figure 21: Channel rail kit with tools and accessories
Instructions for attaching the channel rails to the backbox:
1. Unpack the RAIL24-PR, RAIL30-PR, or RAIL48-PR kit and find the following contents:
a. Two mounting rails
b. (4) 1/4-20 x 1” Hex Head Screws
c. (4) 1/4” Hex Nuts
d. (8) 1/4” Flat Washers
e. (4) 1/4” Lock Washers
f. Liability Waiver Card
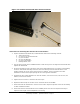
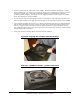
2. Set rail along one side of the C12BB3 backbox so that the leg of the rail aligns with the slotted holes
against the slotted tabs.
3. Orient the leg with the row of ten 9/32” holes in the desired direction for it to fasten to the building
structure. The installer will likely orient the rail so that this leg faces the same direction as the
speaker and will rest on top of the ceiling structure. However, keep in mind there are other
installation scenarios that require placing the rail in the opposite orientation.
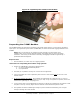
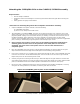
4. Assemble the hex screws hardware. For each tab location, use one hex screw, one hex nut, two
washers, and one lock washer.
5. Tighten the hex screws to a maximum 10 lb-ft torque.
6. Repeat the above steps for the other rail on the other side of the C12BB3.
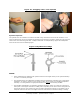
7. Please note that the slotted hole in the rail can be used to adjust the position of the rail horizontally
for best installation location.
8. Please note also that the slotted tab on the C12BB3 permits the rail to be adjusted vertically to
adjust the trim height of the loudspeaker in the ceiling.