
Operating instructions


Community CLOUD12 – Operation Manual - Page 18
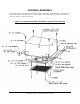
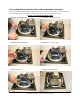
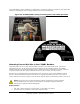
Connecting the Loudspeaker Cable for 70V/100V Connections
Connect the common side of the speaker cable to the “common” terminal on the input block. Connect the
positive side of the speaker cable to the appropriate 70V/100V wattage tap based on the requirements of
the project. For multiple 70V/100V speakers, attach the subsequent speakers by parallel connecting them to
the “common” and appropriate autoformer input terminals of the previous speaker.
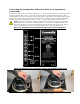
NOTE: Community recommends crimping a spade terminal (¼" width spade) to the end of the
speaker wire prior to connection to the terminal block. In the absence of spade terminals, wire
ends can be stripped ¼" (7mm) and connected to the terminal block. Be careful not to strip too
much as frayed wire ends can short across the terminal block. Ring terminals do not fit.
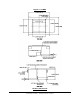
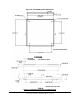
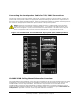
Figure 17: CLOUD1266T and CLOUD1299T input panel (70V/100V operation)
CLOUD12SUB Ceiling Mount Subwoofer Overview
The CLOUD12SUB ceiling subwoofer is the same size and weight as the full-range CLOUD12 Series of ceiling
loudspeakers. All mechanical assembly and installation instructions and procedures are the same for the
CLOUD12SUB as the full-range assemblies. The autoformer tap selections on the 70V/100V version
CLOUD12SUB-T and the full-range assemblies are identical. Differences in sensitivity among the various
models will require different wattage taps, and all amplifier power is calculated using the total number of
loudspeakers, regardless of the mix of full-range and subwoofer assemblies.