
Installation Guide


6
Installation (continued)
2
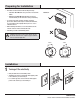
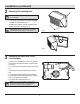
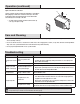
Removing the mounting base
NOTE: The mounting base screws (C) come pre-installed
on the light xture.
□ Loosen the two mounting base screws (C) using a Phillips
screwdriver to open the xture. (Fig. 1)
□ The xture opens sideways from the mounting base (D)
and stays connected on the hinge. (Fig. 2)
CAUTION: DO NOT touch the LED and photocell lens (E)
inside the xture. DO NOT damage or soil the reector.
C
Fig. 1
Fig. 2
D
D
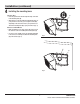
3
Removing the knock outs on the
mounting base
□ For junction box mount: Measure the size of your junction
box and refer to the guide in the gure to select the holes
to knock out.
□ For 3-1/4 in. junction box: Knock out two holes in the inner
ring.
□ For 4 in. junction box: Knock out two holes on the outer
ring.
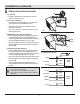
□ For surface mount: Measure the distance between two
holes, pre-drill holes into the mounting surface, and drill
holes on the desired ring accordingly.
□ Use a power drill to drill out the two holes.
NOTE: If necessary, you may drill out mounting holes
through the back plate housing to correspond with the
junction box or wall surface for level mounting.