OEM User Manual 2nd Generation Copyright © 2020 LogicBlue Technology
Limited Warranty The warranty obligations of LogicBlue Technology (“LogicBlue”) for this product are limited to the terms set forth below. What is Covered This limited warranty covers defects in the materials and workmanship in this product.
As with all electronic devices, they are susceptible to damage by static electricity discharge. Before removing the cover of this product be sure to discharge the static electricity in your body by touching a piece of grounded metal. FCC STATEMENT 1. This device complies with Part 15 of the FCC Rules. Operation is subject to the following two conditions: (1) This device may not cause harmful interference.
IC Statement This device complies with Industry Canada licence-exempt RSS standard(s). Operation is subject to the following two conditions: (1) this device may not cause interference, and (2) this device must accept any interference, including interference that may cause undesired operation of the device. Le présent appareil est conforme audio CNR d'Industrie Canada applicable audio appareils radio exempts de licence.
Setup and Install the LevelMatePRO 1) Insure that 12v DC power is currently supplied to the RV 2) Put the LevelMatePRO in “learn” mode The LevelMatePRO has a security feature that records the unique serial number of the device to your smartphone or tablet so that when you are in close proximity to other vehicles with LevelMatePRO installed, your smartphone or tablet will only recognize your LevelMatePRO.
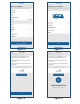
5) Begin the LevelMatePRO setup The LevelMatePRO app has a Setup Wizard that will guide you through the setup process. Each step in the Setup Wizard is detailed below. Completing each step will automatically advance you to the next step until the process is complete. Beginning with Step 2, each step includes a ‘Back’ button at the top left of the screen to allow you to return to the previous step if needed. Step 1) Select your vehicle type (figure 3).
Resolution (figure 8). Contextual help is available for some settings and can be accessed by tapping the icon. Explanations of the other settings are below. The Installation Orientation setting relates to which way the label faces after the LevelMatePRO has been mounted in its permanent location. See figure 10 for examples of installation locations and their corresponding installation orientations.
screen in the LevelMatePRO app. You can also use this button to reset the level at any time in the future if necessary. Your LevelMatePRO setup is now complete and is ready for use. After tapping the ‘Finish Setup’ button you will then be taken on a tour of the app to familiarize you with its operation. You can step through the tour in either direction using the ‘Next’ and ‘Back’ buttons. Note that the tour will only be shown one time.
figure 2 figure 3 figure 4 figure 5
figure 6 figure 7 figure 8 figure 9
Label faces rear Label faces Driver’s Side Label faces passenger side Label faces Driver’s side Label faces front figure 10
Using the LevelMatePRO 1) Position your vehicle Move your vehicle to the location where you would like to begin leveling. 2) Connect to the LevelMatePRO After you have completed installation and configuration of your LevelMatePRO unit and app (at the beginning of this manual), you are ready to begin using the product to level your vehicle. Using the on/off switch, turn on the LevelMatePRO (you will hear 2 beeps) and then start the LevelMatePRO app.
to-side. The displayed measurement indicates how much height will be required on the side where the arrow is displayed. If you are using ramps for leveling, place the ramp(s) either in the front or rear of the tire(s) on the side indicated by the red arrow. Then move the trailer onto the ramp(s) until the measurement distance displays 0.00”.
6) Level your towable vehicle from front-to-back Once your vehicle is level from side-to-side you are ready to begin leveling from front-to-back. For this step you will be using the bottom section of the Leveling screen. Similar to the side-to-side leveling step, when the vehicle is not in a level position there will be a red arrow pointing up or down near the front of the trailer graphic side view (figure 11).
of the vehicle. To level the vehicle, simply stack your blocks in front of or behind each wheel to the height indicated for that wheel. Once the blocks are stacked, drive onto all of the stacks of blocks at the same time and the vehicle should reach a level position. Once the vehicle is on all of the blocks, the measurement distance displayed for each wheel should be 0.00” (figure 16). If you still have one or more wheels displaying a non-zero distance, make note of the distance for each wheel.
0.00”. It is also important to understand that if you overshoot a height this will result in the opposite wheels to then be indicated as needing to be raised. For example, prior to leveling the front wheels are both displaying 0.00” and the rear wheels are both displaying 3.50”. If the blocks you use are all 1” thick and you decide to use 4 blocks under each of the rear wheels, you are raising the rear 4” instead of 3.5” or overshooting by 0.50”.
figure 13 figure 14 figure 15 figure 16
Using the LevelMatePRO with Apple Watch NOTE: To use the LevelMatePRO app for Apple Watch, your watch must be connected to an iPhone. Apple Watches connected to an Android phone cannot access Apple Watch apps as they do not have access to the Apple app store. 1) Install the LevelMatePRO app on Apple Watch The LevelMatePRO app should automatically install on the Apple Watch that is connected to your iPhone.
NOTE: Changing the Leveling screen view from front and side to top view or vice-versa is not possible directly from the Apple Watch app and must be done on the iPhone. 4) Save and Recall Hitch position If your LevelMatePRO+ is configured for a towable vehicle type (travel trailer, fifth wheel or popup/hybrid) you will have access to the Save and Recall Hitch Position features on your Apple Watch.
About LogicBlue Technology Formed in 2014 by two former coworkers, LogicBlue Technology began with plans to develop unique, patented products to fill spaces within industries where technical advantages weren't being realized. Being campers ourselves, we saw a need for technical products to simplify RV setup and increase safety and convenience. Overcoming a lot of technical challenges and other hurdles we finally made it to the marketplace with our first product in May 2016, the LevelMatePRO.