
User's Manual
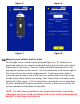
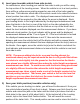
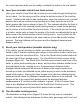
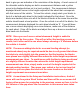
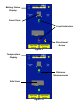

back to give you an indication of the orientation of the display. At each corner of
the driveable vehicle display are both a measurement distance and a yellow
arrow (only displayed when not in a level position). The measurement distance
displayed at each corner is the height required for the wheel that corresponds
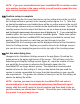
with that corner of the vehicle. To level the vehicle, simply stack your blocks in
front of or behind each wheel to the height indicated for that wheel. Once the
blocks are stacked, drive onto all of the stacks of blocks at the same time and the
vehicle should reach a level position. Once the vehicle is on all of the blocks, the
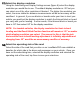
measurement distance displayed for each wheel should be ‘0’. If you still have
one or more wheels displaying a non-zero distance, make note of the distance
for each wheel. Drive off the blocks and adjust them up or down as needed and
drive back onto the blocks.
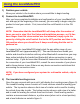
NOTE: Since you can’t move a wheel downward, height is added to
another wheel by the system. This will not affect the leveling process or
results, but it does result in one wheel always showing a ‘0’ distance before
the vehicle is leveled.
NOTE: The reason adding blocks for a second leveling attempt (as
mentioned above) may be required would be due to soft ground that allows
the blocks to sink slightly into the ground or that the location the blocks
were placed was slightly different than where the initial height requirement
measurement was taken. To avoid issues with the blocks being positioned
at a slightly different location than where the initial height requirement
measurement was taken, simply make a note of the height required at the
desired parking location. Then move your vehicle a foot or two from that
position so you can place the blocks at the same location as the initial
height requirement measurement was taken.
NOTE: As mentioned in the Setup and Installation instructions, Android
users will use the system ‘Back’ button and there will be no on screen left
facing yellow arrows for navigating to the previous screen as there is in the
iOS version of the app where the screenshots in this manual were taken
from.