
User's Manual


1) Position your vehicle
Move your vehicle to the location where you would like to begin leveling.
2) Connect to LevelMatePRO
After you have completed installation and configuration of your LevelMatePRO
unit and app (at the beginning of this manual), you are ready to begin using the
product to level your vehicle. First, insure that the on/off switch is in the ON
position.
NOTE: Remember that the LevelMatePRO will sleep after the number of
hours you set in step 16 of the Setup and Installation process, so if it has
been longer than that since motion was last detected, simply cycle the
power by sliding the on/off switch first to the OFF position and then to the
ON position where you should hear 2 beeps confirming that the unit is
powered on.
To connect to the LevelMatePRO simply start the app within range of your
LevelMatePRO unit (approximately 50’). This can be done from inside your
vehicle and should not interfere with any other Bluetooth® connections you may
have active including the hands-free Bluetooth® phone connection in many
vehicles today. If you do have other Bluetooth® connections that interfere with
the connection of your LevelMatePRO, consult the user manuals of your phone
and/or those devices to see if there are any device connection restrictions that
are causing the connection issue.
NOTE: If you have configured your system for a driveable vehicle, skip to
step 8.
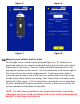
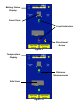
3) The towable leveling screen
Once the app connects with your unit it will display the Leveling screen (figure 9).
The towable leveling screen consists of 2 main sections related to leveling your
vehicle. The top section shows a front view of a trailer and is used for leveling
the vehicle from side-to-side. The bottom section shows a side view of a trailer
and is used for leveling the vehicle from front-to-back. Each leveling section
contains a measurement distance, a yellow arrow (when not in a level position)
and a level indicator as noted in figure 9.
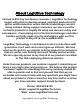
Using the LevelMatePRO