
User guide

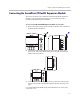

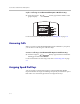
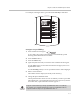
Table Of Contents
- Changes to This Guide
- Contents
- Getting Started with Your SoundPoint® IP 650 Desktop Phone
- Customizing Your SoundPoint® IP 650 Desktop Phone
- Configuring Basic Settings
- Changing the Appearance of Time and Date
- Changing the Display Contrast
- Changing the Backlight Intensity
- Enabling the Headset Memory Mode
- Selecting the Correct Headset for Electronic Hookswitch
- Selecting the Ring Type
- Changing the Language
- Changing the Graphic Display Background
- Muting the Microphone
- Adjusting the Volume
- Managing Call Lists
- Managing Contacts
- Managing Incoming Calls
- System Customizations
- Configuring Basic Settings
- Using the Basic Features of Your SoundPoint® IP 650 Desktop Phone
- Using the Advanced Features of Your SoundPoint® IP 650 Desktop Phone
- Using the SoundPoint® IP Backlit Expansion Module
- Troubleshooting Your SoundPoint® IP 650 Desktop Phone
- Regulatory Notices
- Index

Using the SoundPoint
®
IP Backlit Expansion Module
5 - 3
Connecting the SoundPoint IP Backlit Expansion Module
This section describes how to attach the SoundPoint IP Backlit Expansion
Module to your SoundPoint IP 650 phone. You can attach up to three
SoundPoint IP Backlit Expansion Modules.
To connect a SoundPoint IP Backlit Expansion Module to your phone:
1. Remove the rubber plug from the SoundPoint IP 650 or the SoundPoint
IP Backlit Expansion Module.
2. Align the SoundPoint IP Backlit Expansion Module at the top of the
groove lines on the SoundPoint IP 650 phone and slide it downwards
until it clicks into position.
3. Connect the base stand by aligning the two protrusions on the stand to
the holes on the back of the Backlit Expansion Module and snap it into
place.
For each SoundPoint IP Backlit Expansion Module that you want to add,
repeat steps 1 to 3.
ABC
21
DEF
3
54
MNOJKLGHI
6
Menu
Messages
Do Not Disturb
s
ns
e
ABC
21
DEF
3
54
MNOJKLGHI
6
Menu
Messages
Do Not Disturb