
User guide
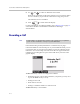
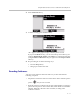
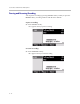

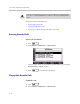


Table Of Contents
- Changes to This Guide
- Contents
- Getting Started with Your SoundPoint® IP 650 Desktop Phone
- Customizing Your SoundPoint® IP 650 Desktop Phone
- Configuring Basic Settings
- Changing the Appearance of Time and Date
- Changing the Display Contrast
- Changing the Backlight Intensity
- Enabling the Headset Memory Mode
- Selecting the Correct Headset for Electronic Hookswitch
- Selecting the Ring Type
- Changing the Language
- Changing the Graphic Display Background
- Muting the Microphone
- Adjusting the Volume
- Managing Call Lists
- Managing Contacts
- Managing Incoming Calls
- System Customizations
- Configuring Basic Settings
- Using the Basic Features of Your SoundPoint® IP 650 Desktop Phone
- Using the Advanced Features of Your SoundPoint® IP 650 Desktop Phone
- Using the SoundPoint® IP Backlit Expansion Module
- Troubleshooting Your SoundPoint® IP 650 Desktop Phone
- Regulatory Notices
- Index

Using the Advanced Features of Your SoundPoint
®
IP 650 Desktop Phone
4 - 11
2. Press the Record soft key.
3. To start recording, press the Start soft key.
“*R*” appears on the graphic display while the phone records.
If you press the Back soft key, you can access the top-level soft keys (for
example, Hold, EndCall, Trnsfer, and Confrnc). You must navigate back
(using the More and Record soft keys) to again access the Stop and Pause
soft keys.
4. Stop recording in one of the following ways:
— Press the Stop soft key.
— Hang-up or end the active call.
Recording Conferences
You can record conference calls in the same way as other calls with the
following exceptions:
• All parties in a conference call are recorded. If one of the conference parties
presses , they are not recorded.
• When all parties in a conference call are put on hold together, recording is
paused. You can place or answer other calls, which will be recorded in the
same file. When the conference call is resumed, recording of the
conference resumes.