
User guide
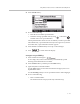


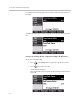
Table Of Contents
- Changes to This Guide
- Contents
- Getting Started with Your SoundPoint® IP 650 Desktop Phone
- Customizing Your SoundPoint® IP 650 Desktop Phone
- Configuring Basic Settings
- Changing the Appearance of Time and Date
- Changing the Display Contrast
- Changing the Backlight Intensity
- Enabling the Headset Memory Mode
- Selecting the Correct Headset for Electronic Hookswitch
- Selecting the Ring Type
- Changing the Language
- Changing the Graphic Display Background
- Muting the Microphone
- Adjusting the Volume
- Managing Call Lists
- Managing Contacts
- Managing Incoming Calls
- System Customizations
- Configuring Basic Settings
- Using the Basic Features of Your SoundPoint® IP 650 Desktop Phone
- Using the Advanced Features of Your SoundPoint® IP 650 Desktop Phone
- Using the SoundPoint® IP Backlit Expansion Module
- Troubleshooting Your SoundPoint® IP 650 Desktop Phone
- Regulatory Notices
- Index
User Guide SoundPoint IP 650 Desktop Phone
4 - 4
To send a text message:
1. Do one of the following:
— Press .
Select Instant Messages.
— Press .
Select Features > Messages > Instant Messages.
2. (Optional) If multiple lines are configured on your phone, first select from
which line to send the message from the list using and .
3. Press the New soft key.
4. Enter the number.
Use the 1/A/a soft key to alternate between numeric and upper/lower case
alphanumeric modes.
5. Press the Ok soft key.
6. Do one of the following:
— Press the Select soft key to choose from various pre-scripted short
messages.
— Press the Edit soft key to compose a custom message.
Use dial pad keys to cycle through the character set. Use keys 1, *, 0,
and # to select special characters.
7. Press the Send soft key when finished.
8. Press to return to the idle display.
Note
Screen options may vary with your application. Voice Mail may be accessible with a
single key press. Contact your system administrator about this option.
Note
You can also enter the SIP URL or IP address. For more information on dialing with
SIP URL or IP address, refer to Placing Calls on page 3-2.