
Installation manual


Table Of Contents
- Safety
- Local Codes
- Product Identification
- Unpacking
- Product Features
- Remote Control Accessories
- Air For Combustion and Ventilation
- Installation
- Operation
- Inspecting Burners
- Cleaning and Maintenance
- Troubleshooting
- Specifications
- Wiring Diagram
- Parts
- Replacement Parts
- Technical Service
- Service Hints
- Parts Central
- Accessories
- Warranty
www.desatech.com
111161-01K10
Use the correct gas type (natural or propane/
LP) for your unit. If your gas supply is not cor-
rect, do not install heater. Call dealer where
you bought heater for proper type heater.
-
INSTALLATION AND CLEARANCES
()
WARNING: Maintain the
Side Wall 16" Ceiling: 42"
24" 17" 13" 28" 21"
30" 17" 13" 34" 24"
* Measured at 13" depth.
Carefully follow the instructions below. This
will ensure safe installation into a masonry,
UL127-listed manufactured replace or listed
vent-free rebox.
-
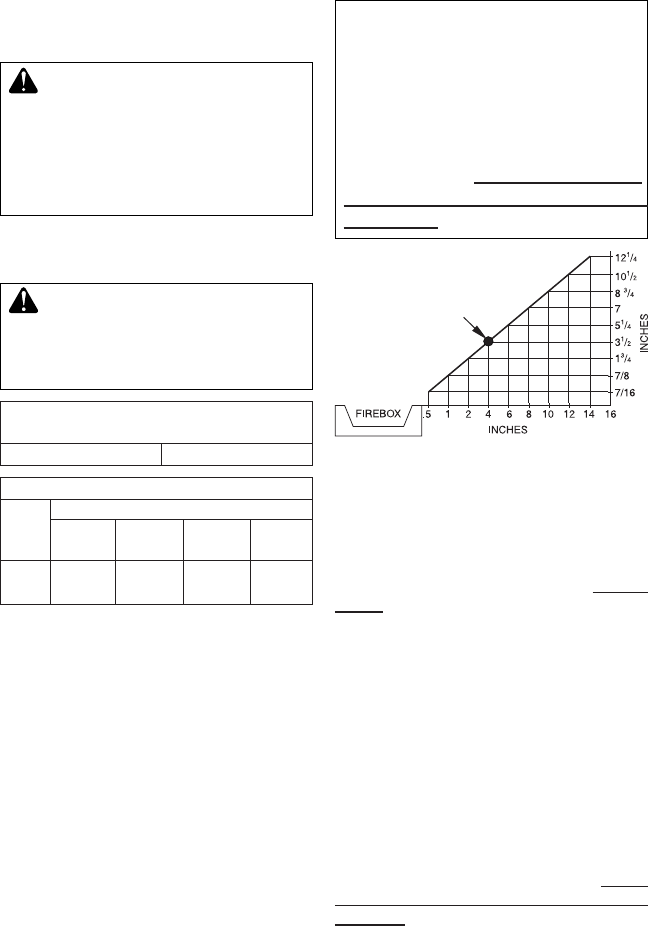
A. Clearances from the side of the replace
cabinet to any combustible material and
wall should follow diagram in Figure 4.
Example: The face of a mantel, bookshelf,
etc. is made of combustible material and
protrudes 3
1
/
2
" from the wall. This com-
bustible material must be 4" from the side
of the replace opening (see Figure 4).
Note: When installing your gas logs into
a manufactured rebox, follow rebox
manufacturer’s instructions for minimum
clearances to combustible materials.
INSTALLATION
Continued
Figure 4 - Minimum Clearance for
Combustible to Wall
*Minimum 16" from Side Wall
*
Example
Clearances
Note: If using a mantel, proceed to If Using
Mantel, page 11. If not using a mantel, follow
the information below.
You must have noncombustible material(s)
above the replace opening. Noncombustible
materials (such as slate, marble, tile, etc.)
must be at least 1/2" thick. With sheet metal,
you must have noncombustible material be-
hind it. Noncombustible material must extend
at least 8" up. If noncombustible material is
less than 12", you must install the replace
hood accessory. See Figure 5, page 11, for
minimum clearances.
IMPORTANT: If you cannot meet these mini-
mum clearances, you must operate heater
with chimney ue damper open. Go to Install-
ing Damper Clamp Accessory for Vented
Operation, page 12.
B. Clearances from top of replace opening
to ceiling should not be less than 42".
NOTICE: Manual control heaters
If so, you must always run heater
Installing Damper
Clamp Accessory for Vented
Operation