
User manual

Micro Receiver DT20
5
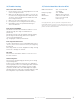
5) Getting started
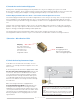
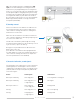
Connect the Micro Receiver DT20 to the audio shoe on
the hearing instrument. Check that the audio shoe is
connected to the hearing instrument according to the
manufacturer’s instructions.
Make sure that the Micro Receiver DT20 is fitted in the
correct manner and push the Euro-plug completely into
the socket of the audio shoe.
The Micro Receiver DT20 is powered by the hearing
instrument’s battery. Make sure that the battery is fresh.
If you are unsure, replace the battery.
Briefly press the push-button on the Micro Receiver
DT20 to turn it on or off.
(If the Micro Receiver DT20 has been programmed to
the mode
Always on,
it will start automatically when it’s
connected to the hearing instrument. The on/off func-
tion of the push-button is then disabled.)
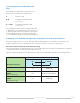
6) Acoustic indication, sound signals
The following is a description of the acoustic indications
(sound signals). The sound signals consist of various
combinations of two different tones: one high pitch tone
(1000 Hz) and one low pitch tone (500 Hz), and two dif-
ferent tone lengths.
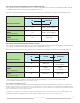
Action: Sound signal: Indicate this:
Button pressed briefly Short high pitch
•
Selecting mode or turning on
Button pressed briefly Short high pitch x 2
••
— Turning off
+ long low pitch
Button pressed 2 sec. Short low pitch
•
•
Pairing mode
+ short high pitch
Pairing Short high pitch x 2
••
Successful pairing
Pairing Long high pitch
—
— Pairing failed
+ long low pitch
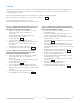
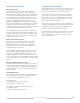
2b. If the hearing instrument is equipped with a DAI
input (check with audiologist or hearing instrument
manufacturer), no programming of the hearing instru-
ment is necessary. The Micro Receiver DT20 works with
the Microphone (M) listening program on your hearing
instrument. By setting up the Micro Receiver DT20 with
the Programmer DT20, the push-button on the Micro
Receiver DT20 can be used to select the listening mode:
Radio only (R mode) or Radio + Hearing instrument
microphone (R+M mode).
Europlug
DT20