Designed by Parents, for Parents Keep this instruction manual for future use. Store instruction manual inside pocket on back of car seat. © 2004 Combi USA, Inc. ACS0903c Combi USA • 1962 Hwy 160 West, #100 • Fort Mill, SC 29708 • Consumer Affairs Telephone 1-800-992-6624 • Se Habla Español 1-803-548-6633 • Fax 1-803-548-3663 • www.combi-intl.
1 Section 1 - Table of Contents Table of Contents.....................................................1 Warnings.................................................................3 Proper Use Check List.............................................5 Avatar™ Car Seat Parts...........................................7 Use Recommendations...........................................9 Selecting A Vehicle Seating Location....................12 LATCH System.....................................................
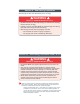
Section 2 - Warnings WARNING DEATH or SERIOUS INJURY can occur • Failure to follow these instructions and car seat labels can result in injury or death to a child from striking the vehicle’s interior during a sudden stop or crash. • Use only in a rear-facing position when using this car seat with an infant less than one year old and weighing less than 20 pounds (9 kg). • Use only with children who weigh between 5 and 40 pounds (2.3 and 18 kg) and whose height is between 19 and 40 inches (48 and 102 cm).
5 Section 3 - Proper Use Check List • • • • • • • • Proper use is required. Read and understand instructions and car seat labels. Securely install car seat with LATCH System or vehicle seat belt and top tether strap. Snugly adjust harness around child. Infants less than one year old and 20 lbs. (9 kg) must use car seat rear-facing. Do not use car seat rear-facing in vehicle front seating location with an air bag. Secure children in back seat whenever possible. Never leave child unattended.
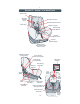
7 Section 4 - Avatar™ Car Seat Parts Infant Insert Shoulder Harness Slots Shoulder Harness Shoulder Harness Cover Chest Clip Buckle Tongues Crotch Strap with Buckle Harness Adjuster Lever Harness Adjuster Strap Recline Lever (Red handle under front of seat) LATCH Connector Storage Ring Lower Anchor Belt and Connector Instruction Manual Rear-facing Level Indicator ® fo or rC H il d r e n T LA CH rs sa nd T eth e WARNING Correct installation and use can be a matter of Life or Death! Read and u
9 Section 5 - Use Recommendations WARNING DEATH or SERIOUS INJURY can occur • Children less than one year old and 20 lbs. (9 kg) must use this car seat rear-facing. Serious crippling injury or death can result if infant faces front of vehicle. Height and Weight Limits: This child restraint is designed for use only by children whose: - Weight is between 5 and 40 pounds (2.3 and 18 kg) and, - Height is between 19 and 40 inches (48 and 102 cm).
11 Forward-facing Use: 20 to 40 lbs. (9 to 18 kg) • Toddlers 20 to 30 lbs. (9 to 13.6 kg), over one year of age, and who are capable of sitting upright unassisted may be forward-facing. If unable to sit unassisted, use rear-facing. • Toddlers 30 to 40 lbs. (13.6 to 18 kg) and up to 40 inches (102 cm) tall MUST be forward-facing. 5 lbs. (2.3 kg) 20 lbs. (9 kg) 30 lbs. (13.6 kg) 40 lbs.
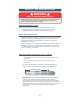
13 3 Refer to vehicle owner’s manual for car seat installation instructions for your vehicle. - Use car seat in a rear vehicle seat location whenever possible. - Never put a car seat in a front seat location unless recommended by vehicle owner’s manual. - For vehicles with air bags, refer to vehicle owner’s manual for child restraint installation information. DO NOT place rear-facing child seat on front seat with air bag. DEATH OR SERIOUS INJURY can occur.
15 Section 7 - LATCH System LATCH System On This Car Seat: 3 The LATCH System on the Avatar Car Seat consists of a lower anchor belt 1 with lower anchor connectors 2 and for forward-facing use, a top tether strap with tether hook 3 (fig. a). 2 1 (fig. a) Rear-facing car seat installation typically uses only the lower anchor belt 1 with lower anchor connectors 2 (fig. b), no top tether.
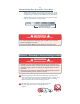
17 Section 8 - Rear-facing Installation Rear-facing For Use 5 to 30 Pounds (2.3 to 13.6 kg) WARNING DEATH or SERIOUS INJURY can occur • DO NOT use this car seat rear-facing in a vehicle front seating location with an air bag. • LATCH or vehicle seat belt MUST be routed though rear-facing belt path when using car seat rear-facing. • Rear-facing car seat must be properly reclined: - Too reclined can result in injury or ejection. - Too upright can result in breathing difficulties.
19 2 After selecting a seating location, if adjustable, adjust vehicle seat back into most upright position. LATCH Connector Storage Ring 3 Rotate car seat on lower base to rear-facing position, see “Changing Hook-on Forward-Facing/Rear-Facing Use Lower Anchor Position” section. Connector 4 Remove the lower anchor connectors from their storage locations on back of car seat pad (fig. a). (fig. a) Hook-on Connector - Depress spring on hook-on connector (fig.
21 9 Connect low anchor connectors to vehicle lower anchors. - Position the lower anchor belt with the belt adjuster slide button facing away from the car seat. If the adjuster is not in that position, turn the belt and adjuster over. Check that lower anchor belt is flat, not twisted. 1 3 (fig. f) - With hook-on connector opening facing down 1 , position the opening of the connector over the vehicle lower anchor. Push down 2 and then pull out 3 on the connector to lock it onto the vehicle anchor (fig.
23 Removal Of Car Seat Installed With LATCH: 1 Loosen lower anchor belt by depressing belt adjuster slide button and pulling out lower anchor belt. - Pressing down in center of car seat to reduce tension on lower anchor belt will make it easier to loosen lower anchor belt. 2 Remove hook-on connectors from vehicle anchors. - Press and hold the connector retainer spring 1 . 3 - Push connector in, then rotate connector 2 , and pull out 3 to unhook from the vehicle anchor (fig. j).
25 Section 8b - Rear-facing Installation With Vehicle Seat Belt WARNING DEATH or SERIOUS INJURY can occur • Not all vehicle seat belts can be used with this car seat. Read vehicle owner’s manual and “Vehicle Seat Belts” section in this manual. • Vehicle seat belt MUST stay tightly adjusted around car seat at all times. If vehicle seat belt does not stay tight, read the vehicle owner’s manual and “Vehicle Seat Belts” section in this manual.
27 9 Tighten vehicle seat belt to secure the car seat. - Press down in center of car seat to depress the vehicle cushion while tightening vehicle seat belt (fig. e). (fig. e) 10 Close belt lock-off over lap or lap and shoulder belt (fig. f). To close: - Push down lock-off cover 2 . - Then push down locking tab 1 . 11 Check recline of car seat. Line inside level indicator MUST be in green striped 2 1 (fig. f) zone (fig. b).
29 Section 9 - Forward-facing Installation Forward-facing For Use 20 to 40 Pounds (9 to 18 kg) WARNING DEATH or SERIOUS INJURY can occur • Children less than one year old and 20 lbs. (9 kg) must use this car seat rear-facing. Serious crippling injury or death can result if infant faces front of vehicle. • LATCH or vehicle seat belt MUST be routed though forward-facing belt path when using car seat forward-facing.
31 LATCH Connector Storage Ring 2 After selecting a seating location, if adjustable, adjust vehicle seat back into most upright position. 3 Rotate car seat on lower base to forward-facing position, see “Changing Forward-Facing/Rear-Facing Use Position” section. (fig. a) Hook-on Lower Anchor Connector 4 Remove the lower anchor connectors from their storage locations on back of car seat pad (fig. a). - Depress spring on hook-on connector (fig. b) and remove from LATCH connector storage ring.
33 10 Tighten lower anchor belt to secure the car seat. Press down in center of car seat to depress the vehicle cushion and pull free end of lower anchor belt to tighten belt (fig. f). 11 Check for secure installation. Gripping car seat (fig. f) at top of armrest, pull car seat front to back and left to right to check for secure installation (fig. g). LATCH belt MUST stay tight.
35 Storage Of Lower Anchor Belt And Connectors: When not using the LATCH System, store the lower anchor belt and connectors by snapping the connectors onto LATCH connector storage rings located on the back side of the seat pad (fig. l). Pull on free end of lower anchor belt to tighten. NOTE: To prevent damage to the seat pad, care should be taken when removing or securing connectors. Excessive force could damage or tear seat pad. (fig.
37 5 Adjust car seat to desired recline position 1, 2 or 3. - To change recline position, see “Recline Position Adjustment” section. 1 6 Lift front belt flap on pad and release (fig. b) belt access cover by lifting cover 1 (fig. b). 7 Arrow on red belt lock-off (fig. b) MUST point toward the vehicle seat belt buckle that will be used to secure the vehicle belt. If the arrow is not pointing toward the vehicle buckle, rotate the belt lock-off until the arrow is pointing toward the buckle.
39 12 Check for secure installation. Gripping car seat at top of armrest, pull car seat front to back and left to right to check for secure installation (fig. g). Vehicle lap belt MUST stay tight. If the vehicle lap belt does not stay tight or car seat can not be securely installed, check that arrow on belt lock-off is pointing toward buckle, see vehicle owner’s manual , “Vehicle Seat Belts” section or move to a different seating location. (fig.
41 Section 10 - Securing Child In Car Seat WARNING DEATH or SERIOUS INJURY can occur • Keep harness straps snug and positioned on shoulders and thighs. • Use only the middle or lowest shoulder harness slots when used rear-facing. • For proper harness fit, infant insert MUST be used with small infants. • Discontinue use of the infant insert when: - Child’s shoulders are above middle belt slots in seat back of car seat. - Shoulder belts become too short to fit infant (approximately 5 months of age).
43 4 Place harness straps over child’s shoulders and thighs. For information on harness operation and use, see “Harness Use and Adjustment” section. Click 5 Buckle Harness: - Place top of buckle tongues together and insert buckle tongues into buckle (fig. b). You should hear a click. - Pull up on tongues to be sure they are locked. (fig. b) 6 Pull harness adjuster strap (fig. c) to snugly adjust harness straps. - Check that harness straps are snug on shoulder and thighs.
45 Section 11 - Operation and Adjustments A. Harness Use and Adjustment 1 Harness Straps Adjustment: • To tighten: Pull harness adjuster strap (fig. a). • To loosen: While pressing harness adjuster lever, pull harness straps (fig. b). Harness Adjuster Strap (fig. a) Harness Adjuster Lever (fig. b) 2 Chest Clip Operation: 1 • To open: Press tabs 1 and pull apart 2 (fig. c). • To close: Snap halves together. Make sure chest clip is locked by pulling out. 2 2 1 (fig.
47 To change harness strap slots: 1. Buckle shoulder harness straps and chest clip. 2. From front of car seat, loosen shoulder harness straps by pressing harness adjuster lever and pulling harness straps out to lengthen them. - Make sure both buckle tongues are buckled and chest clip is closed. (fig. f) 3. From back of car seat, remove both metal harness strap clips from adjuster loop (fig. f). Adjuster Loop Metal Harness Strap Clips 4.
49 C. Changing Crotch Strap Position: Rear-facing: Crotch strap MUST be in position closest to but not under child for rear-facing position. Forward-facing: Front position MUST always be used for forward-facing position. To Position Crotch Strap Closer To Child: 1. Remove seat pad from front of car seat. 2. For rear-facing use, if crotch strap is too far away from child, slide crotch strap under crotch strap anchor tabs (fig. i). 3. Replace seat pad over front of car seat.
51 E. Recline Position Adjustment: To change recline position: • Lift and hold recline lever under front of car seat (fig. e). • Push on front or back of car seat to slide into desired recline position. Recline Lever • Release recline lever and check that car seat is locked in the recline position. (fig. e) WARNING DEATH or SERIOUS INJURY can occur • Rear-facing car seat must be properly leveled: - Too reclined can result in injury or ejection. - Too upright can result in breathing difficulties. F.
53 G. LATCH - Changing Belt Path Location: • LATCH lower anchor belt MUST be routed through the correct belt path for use. • Identify correct belt path for rear-facing or forward-facing based on age or weight of child. Rear-Facing Belt Path • To change lower anchor belt location, (fig. a) - Remove seat pad. - From inside seat, pull lower anchor belt and connectors into the seating area. - Insert connector into correct belt path openings and pull out.
55 Belts Forward of Seat Bight Vehicle seat belts located forward of seat bight (fig. a & b) may not securely hold car seat. Check vehicle owner’s manual or see vehicle dealer for car seat installation requirements. Seat • If seating position is Bight approved for use with car seat, install car seat and check for secure installation by pulling car seat front to back. If car seat slides forward or vehicle seat belt (fig. b) does not stay tight, DO Buckle NOT use these seat belts.
57 Passive Restraints Lap Belt with Motorized Shoulder Belt (fig. e) DO NOT use with any car seat. See your vehicle dealer for options for securing a child restraint in this location. (fig. e) Lap or Shoulder Belt Mounted on Front Door (fig. f) DO NOT use with any car seat. Belts will not stay tight while driving. See your vehicle dealer for options for securing a child restraint in this location. (fig. f) Combination Lap/Shoulder Belt with Free Sliding Latch Plate Pull out on latch plate.
59 Section 13 - Additional Information Certification This car seat meets or exceeds all applicable requirements of Federal Motor Vehicle Safety Standard 213 for use in motor vehicles and aircraft. Aircraft Use This car seat is certified for use on aircraft (see label on car seat). Contact airline about their policy. Use this car seat only on forward-facing aircraft seats. Install car seat on aircraft the same way it is installed in a vehicle.
61 Cleaning Seat Pad, Shoulder Harness Covers, and Infant Insert: Machine wash in cool water and mild soap. Roll in towel to remove excess water and lay flat to dry. Cleaning Harness Straps: Surface wash only with mild soap and damp cloth. Cleaning Shell: Wipe with mild solution of soap and water. Avoid wetting labels. Never use “household detergents”: they can weaken plastic. Cleaning Buckle: Rinse buckle with warm water. DO NOT use household detergents. Never lubricate buckle.
Avatar™ Convertible Car Seat Model 8100 Be sure to carefully read this instruction manual before using the product to ensure proper use of the stroller and keep it for future reference. Record the following information for quick reference. Combi USA, Inc.